How To: Create a Visual Studio 2010 Code Snippet
As you work through various projects in Visual Studio 2010 you will find yourself reusing a lot of code. In fact, you may find yourself reusing a lot of the same static code, or code that follows a basic pattern. Visual Studio 2010 lets you cut out a lot of this wasted time by employing code snippets. Code snippets can generate basic code patterns or layouts on the fly inside your project. Today I will walk you through creating a basic code snippet for generating a C# class with specific section stubs.
You will need to start with a generic XML file. You’ll want to keep the XML declaration line inside the file once you create it and change the file extension from .xml to .snippet. For reference I store my stubs inside “C:\Users\Peter\Documents\Visual Studio 2010\Code Snippets\Visual C#\Custom”
Now we can go ahead our XML stub! We will first fill out the required schema information:
<?xml version="1.0" encoding="utf-8"?>

<CodeSnippets xmlns="http://schemas.microsoft.com/VisualStudio/2005/CodeSnippet">
  <CodeSnippet Format="1.0.0">

    <!-- Come with me, and you'll be... -->

  </CodeSnippet>
</CodeSnippets>
Now we are ready to fill out our header information. The header is used to define things such as the title of the snippet, the author, the shortcut for IntelliSense , and a description. The header will also define the snippet type (you can read all about the options of snippet type here) that the snippet will act as. So we will fill out our header now:
<?xml version="1.0" encoding="utf-8"?>

<CodeSnippets xmlns="http://schemas.microsoft.com/VisualStudio/2005/CodeSnippet">
  <CodeSnippet Format="1.0.0">
    <Header>
      <Title>Build Class With #regions</Title>
      <Author>Peter Urda</Author>
      <Shortcut>BuildClassWithRegions</Shortcut>
      <Description>Creates a Class With Common #region Sections</Description>
      <SnippetTypes>
        <SnippetType>Expansion</SnippetType>
      </SnippetTypes>
    </Header>

    <!-- ...in a world of pure imagination... -->

  </CodeSnippet>
</CodeSnippets>
Our next element, which will also be a child of the CodeSnippet element, will define the properties of the actual snippet to be inserted. Now for this example I wanted to be able to replace a single chunk of the snippet when I call the snippet from Visual Studio. This will require the addition of a Declarations section that will control this behavior.
The declaration section can either contain an Object type or a Literal type. We will be covering the Literal type in this example. The literal has an ID, ToolTip, and a Default value. The ID is used by the snippet for where the actual replacement occurs. The ToolTip tag will be used by IntelliSense to give the end-user a hint as to the purpose of the code section that is being worked on. Finally, a default value is declared to be displayed before the user makes the change.
We will go ahead and fill the section out now:
<?xml version="1.0" encoding="utf-8"?>

<CodeSnippets xmlns="http://schemas.microsoft.com/VisualStudio/2005/CodeSnippet">
  <CodeSnippet Format="1.0.0">
    <Header>
      <Title>Build Class With #regions</Title>
      <Author>Peter Urda</Author>
      <Shortcut>BuildClassWithRegions</Shortcut>
      <Description>Creates a Class With Common #region Sections</Description>
      <SnippetTypes>
        <SnippetType>Expansion</SnippetType>
      </SnippetTypes>
    </Header>

    <Snippet>
      <Declarations>
        <Literal>
          <ID>ClassName</ID>
          <ToolTip>Replace with the desired class name.</ToolTip>
          <Default>ClassName</Default>
        </Literal>
      </Declarations>

      <!-- ...take a look and you'll see into your imagination... -->

    </Snippet>
  </CodeSnippet>
</CodeSnippets>
Now we can fill out the final section that will contain the actual code generated by the snippet. We will go ahead and declare that this code is for C#, and create the required tags before we start entering in our code:
<?xml version="1.0" encoding="utf-8"?>

<CodeSnippets xmlns="http://schemas.microsoft.com/VisualStudio/2005/CodeSnippet">
  <CodeSnippet Format="1.0.0">
    <Header>
      <Title>Build Class With #regions</Title>
      <Author>Peter Urda</Author>
      <Shortcut>BuildClassWithRegions</Shortcut>
      <Description>Creates a Class With Common #region Sections</Description>
      <SnippetTypes>
        <SnippetType>Expansion</SnippetType>
      </SnippetTypes>
    </Header>

    <Snippet>
      <Declarations>
        <Literal>
          <ID>ClassName</ID>
          <ToolTip>Replace with the desired class name.</ToolTip>
          <Default>ClassName</Default>
        </Literal>
      </Declarations>

      <Code Language="CSharp">
        <![CDATA[
        /*
        ...we'll begin with a spin traveling in the world of my creation...
        */
        ]]>
      </Code>
    </Snippet>
  </CodeSnippet>
</CodeSnippets>
We will being to enter the code our snippet will generate inside this last section. All the code to be generated by the snippet needs to be placed between the <![CDATA[ and
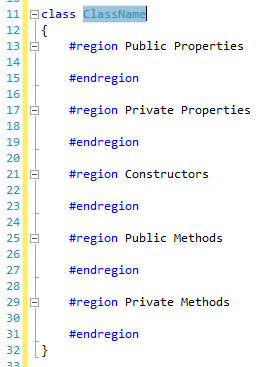
]]> tags. If you fail to do so, your snippet will not work. We also want to call back to the literal declaration we made inside the code. To do this we simply surround the name of the literal with the $ symbol. You should be able to deduce what the snippet will generate from the complete snippet file below:
<?xml version="1.0" encoding="utf-8"?>

<CodeSnippets xmlns="http://schemas.microsoft.com/VisualStudio/2005/CodeSnippet">
  <CodeSnippet Format="1.0.0">
    <Header>
      <Title>Build Class With #regions</Title>
      <Author>Peter Urda</Author>
      <Shortcut>BuildClassWithRegions</Shortcut>
      <Description>Creates a Class With Common #region Sections</Description>
      <SnippetTypes>
        <SnippetType>Expansion</SnippetType>
      </SnippetTypes>
    </Header>

    <Snippet>
      <Declarations>
        <Literal>
          <ID>ClassName</ID>
          <ToolTip>Replace with the desired class name.</ToolTip>
          <Default>ClassName</Default>
        </Literal>
      </Declarations>

      <Code Language="CSharp">
        <![CDATA[class $ClassName$
        {
            #region Public Properties

            #endregion

            #region Private Properties

            #endregion

            #region Constructors

            #endregion

            #region Public Methods

            #endregion

            #region Private Methods

            #endregion
        }]]>
      </Code>
    </Snippet>
  </CodeSnippet>
</CodeSnippets>

<!-- ...what we'll see will defy explanation. -->
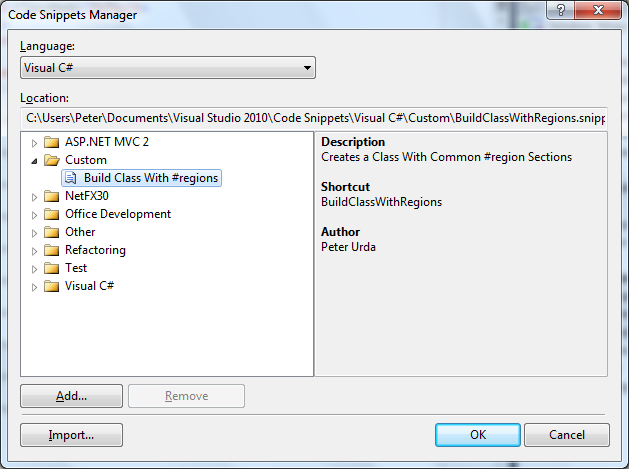
So after all this work we still need to tell Visual Studio 2010 where to find this snippet file. To do this we will need to open the Code Snippets Manager from Tools -> Code Snippets Manager… or with the default keyboard shortcut CTRL+K, CTRL+B inside Visual Studio. Once that is open you may need to reference your custom folder (Mine was at “C:\Users\Peter\Documents\Visual Studio 2010\Code Snippets\Visual C#\Custom” for reference) using the “Add..” button. You can then click do the following:
- Click “Import…”
- Browse to the location of your snippet
- Select the folder you would like Visual Studio to store said snippet (I used my “Custom” folder)
- ..and your done!
If you take a peak back at the main Code Snippets Manager window and find your new snippet you’ll be presented with a screen detailing the information from the header section:
So now just jump back to your C# project and you should be able to just type ‘b’ or ‘B’ for IntelliSense to prompt you with the following:

Like any other snippet (such as prop) a double tab after that point will fill out the code and jump your cursor to the class name for you to rename:
For further reading MSDN has plenty of information on creating advanced snippets. You can find said information by visiting this link. So what are you waiting for? Go make your coding life easier!