Random C# Tricks

I wanted to share a few C# tricks I reviewed today. Some programmers will use them all the time, others barely know about their existence.

In this short source code example I will be demoing the ?? operator, chaining ??, and String.IsNullOrWhiteSpace() which is a newer .NET method.

So here is the source I’ll talk about:

using System;

namespace C.Sharp.Tricks
{
    class Tricks
    {
        static void Main(string[] args)
        {
            /*** ?? Operator ***/
            // Allow x to be null by using 'int?'
            int? x = null;

            // Set y = x if not null, otherwise use 30 for a value
            int y = x ?? 30;

            // Print the results to screen
            Console.WriteLine("*** ?? Operator ***");
            Console.WriteLine("y = x ?? 30\ny = {0}\n", y);

            /*** Chaining ?? Operators **/
            // Set z = x if not null, else if w not null, else y + 1
            int? w = null;
            int z = x ?? w ?? (y + 1);

            // Print the results to screen
            Console.WriteLine("*** Chaining ?? Operators ***");
            Console.WriteLine("z = x ?? w ?? (y + 1)\nz = {0}\n", z);

            /*** String, Null or Empty (Whitespace)? ***/
            // Make a null string, empty string (spaces), and one with 'Hello!'
            string string1 = null;
            string string2 = "      ";
            string string3 = "Hello!";

            // Print the results to screen
            Console.WriteLine("*** String, Null or Empty? ***");
            Console.WriteLine("string1 ... ({0}) -- Null or Empty? " +
                              String.IsNullOrWhiteSpace(string1), string1);
            Console.WriteLine("string2 ... ({0}) -- Null or Empty? " +
                              String.IsNullOrWhiteSpace(string2), string2);
            Console.WriteLine("string3 ... ({0}) -- Null or Empty? " +
                              String.IsNullOrWhiteSpace(string3), string3);
        }
    }
}

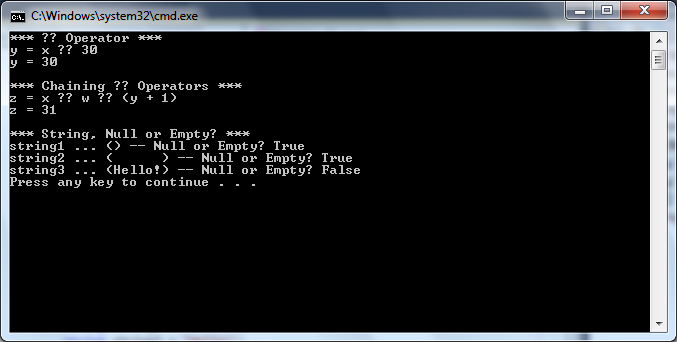
The ?? operator is a simple way to set a variable to something, and if that first condition is null it will fallback to a second value. So since x is null, y will end up being set to 30. The program outputs the expected result to prove that.

Next we will chain the ?? operators together. In my example both x and w are null, so z will have to be set to (y + 1), or 31. The program again prints the expected result to screen.

The benefit that ?? brings to the table is that it turns what could have been a complicated if/else statement, into a logic one-liner. It is also a nice convenience since you can write code that may or may not have to deal with an uninstantiated variable at runtime very easily.

Finally, I have a block of code that shows how the new String.IsNullOrWhiteSpace() method from .NET version 4 works. Basically, the method returns true if a given string is null, or just a bunch of whitespace; otherwise it will return false. So I send in a null, a string with just spaces, and a string with a phrase and I print the expected results to screen. This method could be helpful to determine if the user entered in a space or spaces when in reality it should have been sent in as null or just empty.

Here is a screenshot of the running program:

Program Output

I found these either new or exciting to use today, and I hope you can find interesting ways to incorporate them in your software design!

Read More
Windows Communication Foundation - A Simple Client and Server

Windows Communication Foundation (or WCF for short) is an interface located inside the .NET Framework for creating connected, service-oriented applications. We can use C# and Visual Studio 2010 to build a simple WCF Client and WCF Server. We will start by developing the server and the service it will provide, and from that we can build a WCF Client based on that very server.

First we need to setup our project…

  1. Start Visual Studio 2010 as an Administrator

  2. Create a new Console Application, you can name it WCF.Tutorial.Server

  3. Change the default Service namespace to Microsoft.ServiceModel.Samples

  4. Open the Properties of the of the solution

  5. Select the Application Tab

  6. Change the box Default Namespace to Microsoft.ServiceModel.Samples

  7. You will need to add a reference to System.ServiceModel.dll in your new project.

  8. Rename Program.cs to Server.cs

  9. Update the namespace line inside Server.cs to Microsoft.ServiceModel.Samples

  10. Add using System.ServiceModel; to your Server.cs file.

…and NOW we are ready to build our interface for the service. In this case we are going to build a calculator.

using System;
using System.ServiceModel;
using System.ServiceModel.Description;

namespace Microsoft.ServiceModel.Samples
{
    [ServiceContract(Namespace = "http://Microsoft.ServiceModel.Samles")]
    public interface ICalculator
    {
        [OperationContract]
        double Add(double n1, double n2);
        [OperationContract]
        double Subtract(double n1, double n2);
        [OperationContract]
        double Multiply(double n1, double n2);
        [OperationContract]
        double Divide(double n1, double n2);
    }

    public class CalculatorService : ICalculator
    {
        public double Add(double n1, double n2)
        {
            double result = n1 + n2;
            Console.WriteLine("Received Add({0},{1})", n1, n2);
            // Code added to write output to the console.
            Console.WriteLine("Return: {0}", result);
            return result;
        }

        public double Subtract(double n1, double n2)
        {
            double result = n1 - n2;
            Console.WriteLine("Received Subtract({0},{1})", n1, n2);
            Console.WriteLine("Return: {0}", result);
            return result;
        }

        public double Multiply(double n1, double n2)
        {
            double result = n1 * n2;
            Console.WriteLine("Received Multiply({0},{1})", n1, n2);
            Console.WriteLine("Return: {0}", result);
            return result;
        }

        public double Divide(double n1, double n2)
        {
            double result = n1 / n2;
            Console.WriteLine("Recieved Divide({0},{1})", n1, n2);
            Console.WriteLine("Return: {0}", result);
            return result;
        }
    }

    class Server
    {
        static void Main(string[] args)
        {
            Uri BaseAddress = new Uri("http://localhost:8000/ServiceModelSamples/Service");

            ServiceHost SelfHost = new ServiceHost(typeof(CalculatorService), BaseAddress);
            try
            {
                SelfHost.AddServiceEndpoint(
                        typeof(ICalculator),
                        new WSHttpBinding(),
                        "CalculatorService");

                ServiceMetadataBehavior smb = new ServiceMetadataBehavior();
                smb.HttpGetEnabled = true;
                SelfHost.Description.Behaviors.Add(smb);

                SelfHost.Open();
                Console.WriteLine("The service is ready.");
                Console.WriteLine("Press <ENTER> to terminate service.");
                Console.WriteLine();
                Console.ReadLine();

                // Close the ServiceHostBase to shutdown the service.
                SelfHost.Close();
            }
            catch (CommunicationException ce)
            {
                Console.WriteLine("An exception occured: {0}", ce.Message);
                SelfHost.Abort();
            }
        }
    }
}

The first block of code defines our calculator interface, or ICalculator. We have directives before each method, named OperationContractAttribute, that define what portions of this interface are being exposed for the WCF contract. Pretty straight forward.

Then our second block of code actually defines our CalculatorService. We have added some Console.WriteLine statements that will appear when we start the service up. Again, the operations this calculator is doing are very simple and could easily be added to a standalone program. However, we will be using this to demonstrate how to setup a WCF client-server environment.

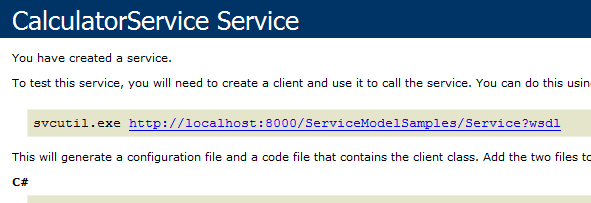
Our final block of code defines the Server class. This will be in charge of spinning up the application and listening on a specified host and port number. In this case it will listen from localhost on port 8000. We declare a new service host, and attempt to bind the server to it. If it fails we catch the error and dump it to screen. If not, it will fire up the service and be ready for use! So go ahead and run your project (without debugging) and after it starts verify that the server is running by opening your web browser and navigating to http://localhost:8000/ServiceModelSamples/Service. You’ll see a screen like this:

WCF Server, Web Browser Page

Now we can just leave that running, and go ahead and build our Client project. Just do the following…

  1. Add a new project to the root of your Solution. Choose Console Application and name it WCF.Tutorial.Client
  2. Add a reference to System.ServiceModel.dll to the new project
  3. Rename Program.cs to Client.cs
  4. Add using System.ServiceModel; to the source code.

Now here is where we can use Visual Studio to build some code for us. Go ahead and open up the Visual Studio 2010 Command Prompt from your Program Files. Inside the command prompt navigate to the location of your client code project.

Now when you are inside the directory you want the generated code to be placed, run this command:

svcutil.exe /language:cs /out:generatedProxy.cs /config:app.config http://localhost:8000/ServiceModelSamples/service

Now all you have to do is add the generatedProxy file to your project. That should be as simple as clicking Show All Files and then Include in Project.

Now let’s define the client:

using System;
using System.ServiceModel;
using System.Text;

namespace Client
{
    class Client
    {
        static void Main(string[] args)
        {
            // Step 1: Create an endpoint address and an instance of the WCF client
            CalculatorClient client = new CalculatorClient();

            // Step 2: Call the service operations.
            // Call Add
            double value1 = 100.00D;
            double value2 = 15.99D;
            double result = client.Add(value1, value2);
            Console.WriteLine("Add({0},{1}) = {2}", value1, value2, result);

            // Call Subtract
            value1 = 145.00D;
            value2 = 76.54D;
            result = client.Subtract(value1, value2);
            Console.WriteLine("Subtract({0},{1}) = {2}", value1, value2, result);

            // Call Multiply
            value1 = 9.00D;
            value2 = 81.25D;
            result = client.Multiply(value1, value2);
            Console.WriteLine("Multiply({0},{1}) = {2}", value1, value2, result);

            // Call Divide
            value1 = 22.00D;
            value2 = 7.00D;
            result = client.Divide(value1, value2);
            Console.WriteLine("Divide({0},{1}) = {2}", value1, value2, result);

            // Step 3: Close the client gracefully.
            // This closes the connection and cleans up resources.
            client.Close();

            Console.WriteLine();
            Console.WriteLine("Press <ENTER> to terminate client.");
            Console.ReadLine();
        }
    }
}

The first step is to create a CalculatorClient object. Then it is as simple as calling any of the following:

client.Add(...);
client.Subtract(...);
client.Multiply(...);
client.Divide(...);

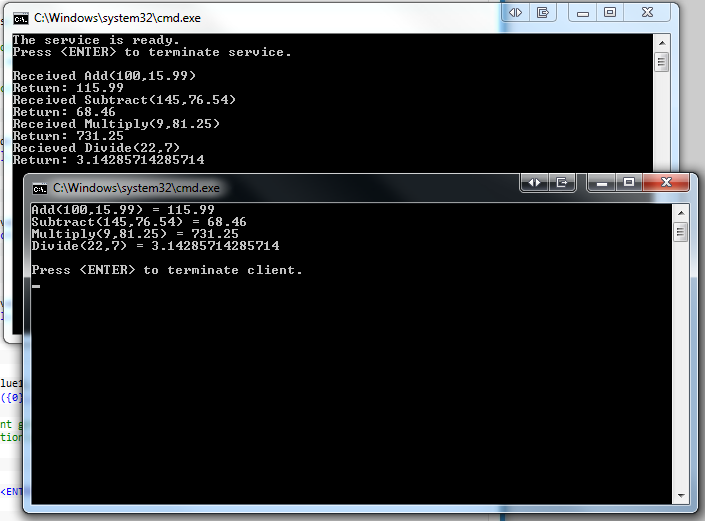
All the above commands will cause our Client app to hit the Server app with requests. The Server app will then run the methods and send back results to the Client. Here is a screenshot of the applications running side-by-side:

WCF Client, Server Outputs

With WCF you can setup dedicated application servers for your client apps to hit with requests. These requests can then be processed either synchronously or asynchronously. In this example we ran the commands synchronously, so we had to wait for the server to kick back results to us. But you could instead build a giant processing server, and have clients request asynchronous tasks and just catch a callback.

WCF can be applied for use in…

  • Distributed Processing
  • Threaded Web Applications
  • Dedicated Servers hosting specific services, all based on their capability
  • Routing tasks [ Client <-—> Proxy(WCF Server & Client) <-—> Server ]
  • …any other possible Client-Server task you would need! The possibilities are up to you.

All of this is easily setup and built by just using C#, .NET, and Visual Studio

  1. If you can write your methods and algorithms in C#, you can extend them for use in WCF.
Read More
Inking in Silverlight

Users with touch screens, stylus-enabled screens, or USB stylus pads appreciate the ability to write and markup documents and files. Plenty of modern applications today support inking natively (Example: OneNote 2010, one application I use in conjunction with my Lenovo tablet as a digital notebook on most days of the week) for a variety of purposes and actions. You may not know it already, but Silverlight has all the required libraries in place to utilizing inking on screen. So today I’ve put together a little Silverlight web app to demonstrate.

The first thing we need to do is define our XAML that will build the visual layout of our web application. In this case we will just call this our MainPage.xaml:

<UserControl x:Class="SilverlightInk.MainPage"
    xmlns="http://schemas.microsoft.com/winfx/2006/xaml/presentation"
    xmlns:x="http://schemas.microsoft.com/winfx/2006/xaml"
>
    <Grid x:Name="MainLayout" Background="Gray">
        <Grid.RowDefinitions>
            <RowDefinition Height="*" />
            <RowDefinition Height="*" />
        </Grid.RowDefinitions>
        <Grid.ColumnDefinitions>
            <ColumnDefinition Width="100" />
            <ColumnDefinition Width="*" />
        </Grid.ColumnDefinitions>

        <Grid x:Name="OptionPanel" Background="Transparent" Grid.Column="0" Grid.Row="0">
            <Grid.RowDefinitions>
                <RowDefinition Height="*" />
                <RowDefinition Height="*" />
            </Grid.RowDefinitions>
            <Grid.ColumnDefinitions>
                <ColumnDefinition Width="*" />
                <ColumnDefinition Width="*" />
            </Grid.ColumnDefinitions>

            <Button x:Name="InkButton" Content="Ink" Grid.Column="0" Grid.Row="0"
                Click="InkButtonClick"
            />
            <Button x:Name="EraseButton" Content="Eraser" Grid.Column="1"
                Grid.Row="0" Click="EraseButtonClick"
            />
        </Grid>

        <Border Background="White" CornerRadius="20" x:Name="BorderInk"
                Grid.Column="1" Grid.Row="0" Grid.RowSpan="2"
        >
            <InkPresenter x:Name="InkPad" Background="Transparent"
                            Cursor="Stylus"
                            MouseLeftButtonDown="InkPadMouseLeftButtonDown"
                            MouseLeftButtonUp="InkPadMouseLeftButtonUp"
                            MouseMove="InkPadMouseMove"
            />
        </Border>
    </Grid>
</UserControl>

The flow of our XAML document, in a nutshell, is as follows:

  • Define top-level grid ‘MainLayout’, make it a 2x2, and set just the left column to a width of 100 (others will be auto)
  • Define a sub-grid in the top left cell, this will be used for storing our buttons
  • Define our buttons, create click actions
  • Place a border object in the right column
  • Place an InkPresenter object inside the border, with required action handlers (MouseLeftButtonDown/Up, MouseMove)

Once our XAML is squared away, we can write the actual code our event handlers will use. So we will go ahead and jump to MainPage.xaml.cs to create the logic behind the application. Let’s go ahead and look at the source code for that.

using System.Windows;
using System.Windows.Controls;
using System.Windows.Ink;
using System.Windows.Input;
using System.Windows.Media;

namespace SilverlightInk
{
    public partial class MainPage : UserControl
    {
        private Stroke _stroke = null;
        private bool _StylusUsed = false;
        private StylusPointCollection _EraserPoints;
        private InkMode _InkMode = InkMode.Draw;

        public enum InkMode { Draw, Erase }

        public MainPage()
        {
            InitializeComponent();
        }

        private void InkPadMouseLeftButtonDown(object sender, MouseButtonEventArgs e)
        {
            InkPad.CaptureMouse();

            if (e.StylusDevice.Inverted)
            {
                _InkMode = InkMode.Erase;
                InkPad.Cursor = Cursors.Eraser;
                if (e.StylusDevice.DeviceType == TabletDeviceType.Stylus)
                    _StylusUsed = true;
            }

            if (_InkMode == InkMode.Erase)
            {
                _EraserPoints = new StylusPointCollection();
                _EraserPoints = e.StylusDevice.GetStylusPoints(InkPad);
            }

            else if (_InkMode == InkMode.Draw)
            {
                _stroke = new Stroke();
                _stroke.DrawingAttributes.Color = Colors.Black;
                _stroke.StylusPoints.Add(e.StylusDevice.GetStylusPoints(InkPad));
                InkPad.Strokes.Add(_stroke);
            }
        }

        private void InkPadMouseLeftButtonUp(object sender, MouseButtonEventArgs e)
        {
            _stroke = null;
            _EraserPoints = null;
            if (_StylusUsed)
            {
                _InkMode = InkMode.Draw;
                _StylusUsed = false;
                InkPad.Cursor = Cursors.Stylus;
            }
            InkPad.ReleaseMouseCapture();
        }

        private void InkPadMouseMove(object sender, MouseEventArgs e)
        {
            if (_InkMode == InkMode.Draw && _stroke != null)
            {
                _stroke.StylusPoints.Add(e.StylusDevice.GetStylusPoints(InkPad));
		    }

            if (_InkMode == InkMode.Erase && _EraserPoints != null)
            {
                _EraserPoints.Add(e.StylusDevice.GetStylusPoints(InkPad));
                StrokeCollection hits = InkPad.Strokes.HitTest(_EraserPoints);
		        for (int i = 0; i < hits.Count; i++)
		        {
                    InkPad.Strokes.Remove(hits[i]);
		        }
		    }
        }

        private void EraseButtonClick(object sender, RoutedEventArgs e)
        {
            InkPad.Cursor = Cursors.Eraser;
            _InkMode = InkMode.Erase;
        }

        private void InkButtonClick(object sender, RoutedEventArgs e)
        {
            InkPad.Cursor = Cursors.Stylus;
            _InkMode = InkMode.Draw;
        }
    }
}

We have four variables used throughout the application:

  • _stroke - Variable to hold a complete ink stroke
  • _StylusUsed - A flag to determine if a stylus device was used, instead of a mouse.
  • _EraserPoints - A collection of points to compare against already inked strokes for erasing purposes
  • _InkMode - Contains constants to flip between ink and erasing modes. The initial setting is drawing when the application starts

Let’s examine the major handlers closely. First we will take a look at our buttons for the application:

private void EraseButtonClick(object sender, RoutedEventArgs e)
{
	InkPad.Cursor = Cursors.Eraser;
	_InkMode = InkMode.Erase;
}

private void InkButtonClick(object sender, RoutedEventArgs e)
{
	InkPad.Cursor = Cursors.Stylus;
	_InkMode = InkMode.Draw;
}

When the respective button is pressed it defines the drawing mode as inking or erasing and changes the cursor icon to reflect the status.

Now we need to look at what exactly happens when you press the left mouse button inside the InkPad.

private void InkPadMouseLeftButtonDown(object sender, MouseButtonEventArgs e)
{
	InkPad.CaptureMouse();

	if (e.StylusDevice.Inverted)
	{
		_InkMode = InkMode.Erase;
		InkPad.Cursor = Cursors.Eraser;
		if (e.StylusDevice.DeviceType == TabletDeviceType.Stylus)
			_StylusUsed = true;
	}

	if (_InkMode == InkMode.Erase)
	{
		_EraserPoints = new StylusPointCollection();
		_EraserPoints = e.StylusDevice.GetStylusPoints(InkPad);
	}

	else if (_InkMode == InkMode.Draw)
	{
		_stroke = new Stroke();
		_stroke.DrawingAttributes.Color = Colors.Black;
		_stroke.StylusPoints.Add(e.StylusDevice.GetStylusPoints(InkPad));
		InkPad.Strokes.Add(_stroke);
	}
}

We first make sure to capture the input of the mouse. After we have done this we need to see if a stylus was used. The easiest way to do that is to see if it was inverted. An inverted stylus should act like an eraser (much like flipping to the other side of a pencil). A normal mouse input will never have an inverted value. However, if we detect that a stylus has been flipped, we can assume the user wants to erase a stroke or strokes from the screen. Once that statement has been evaluated to true we just flip the mode to erase, update the cursor, and flip a flag that lets the program know we used a stylus.

If we hadn’t used a stylus, we simply check to see what mode we are in for inking based on the last button pressed by the user. If we are erasing we collect the points for use later in a variable. Otherwise, we create a new Stroke() object and add the ink on screen.

While the user is moving around on screen, we have another event handler that is running throughout mouse movement.

private void InkPadMouseMove(object sender, MouseEventArgs e)
{
	if (_InkMode == InkMode.Draw && _stroke != null)
	{
		_stroke.StylusPoints.Add(e.StylusDevice.GetStylusPoints(InkPad));
	}

	if (_InkMode == InkMode.Erase && _EraserPoints != null)
	{
		_EraserPoints.Add(e.StylusDevice.GetStylusPoints(InkPad));
		StrokeCollection hits = InkPad.Strokes.HitTest(_EraserPoints);
		for (int i = 0; i < hits.Count; i++)
		{
			InkPad.Strokes.Remove(hits[i]);
		}
	}
}

The handler checks to see if we are drawing and that a stroke exists first. If that is the case we continue to pile on points that create a single line. If we are in erase mode, the handler detects if a given point intersects an already defined stroke. If that is the case, it will remove the entire stroke from the InkPad.

Now after the user has swiped their mouse or stylus around we need to conduct some final actions. These actions are triggered when the left mouse button is released.

private void InkPadMouseLeftButtonUp(object sender, MouseButtonEventArgs e)
{
	_stroke = null;
	_EraserPoints = null;
	if (_StylusUsed)
	{
		_InkMode = InkMode.Draw;
		_StylusUsed = false;
                InkPad.Cursor = Cursors.Stylus;
	}
	InkPad.ReleaseMouseCapture();
}

We reset a few variables to prepare for the next stroke the user may make. We check to see if a stylus was used, and if that is the case we go ahead and reset the mode back to draw and disable the flag. We do this because we do not want the user to erase a stroke, and then expect the application to ink when the correct end of the stylus is applied again. This works because we check for the eraser end of the stylus when preparing to ink. We finally release capture of the mouse from the application.

Our final product will look like this:

Program Output

So there you have it! This project could obviously be extended to include a color picker, the ability to download a sketch, shapes, and just about anything else you would want to add to an inking application. If you are interested in learning about inking in silverlight, you may want to read up on InkPresenter.
Read More
Write to XML with C#

So we can read XML in a variety of ways (one example here, and another here). So can we write it in C#? Of course we can! So lets jump right into shall we?

So here is the steps I take in this sample:

using System;
using System.Xml;

namespace WriteXML01
{
    // Let's establish a generic Person Class, and define necessary methods
    class PersonObject
    {
        public string fname { get; set; }
        public string lname { get; set; }
        public int age { get; set; }
        public char gender { get; set; }

        public PersonObject(string f, string l, int a, char g)
        {
            this.fname = f;
            this.lname = l;
            this.age = a;
            this.gender = g;
        }
    }

    class WriteXML01
    {
        static void Main(string[] args)
        {
            // Let's Build a few people
            PersonObject PeterUrda = new PersonObject("Peter", "Urda", 21, 'M');

            // Lets define an XML document
            XmlDocument XMLDoc = new XmlDocument();

            // Create an XML declaration
            XmlDeclaration XMLDec =
                XMLDoc.CreateXmlDeclaration("1.0", "utf-8", null);

            // Create the root of the XML file
            XmlElement RootNode = XMLDoc.CreateElement("People");
            // Make sure the declaration gets inserted before the XML root
            XMLDoc.InsertBefore(XMLDec, XMLDoc.DocumentElement);
            // Add the root
            XMLDoc.AppendChild(RootNode);

            // Make an object to store the elements in
            XmlElement PersonToXML = XMLDoc.CreateElement("Person");
            // And add that to the XML document
            XMLDoc.DocumentElement.PrependChild(PersonToXML);

            // Make the Elements
            XmlElement FNameNode = XMLDoc.CreateElement("FirstName");
            XmlElement LNameNode = XMLDoc.CreateElement("LastName");
            XmlElement AgeNode = XMLDoc.CreateElement("Age");
            XmlElement GenderNode = XMLDoc.CreateElement("Gender");

            // Load the info for the text information
            XmlText FNameText = XMLDoc.CreateTextNode(PeterUrda.fname);
            XmlText LNameText = XMLDoc.CreateTextNode(PeterUrda.lname);
            XmlText AgeText = XMLDoc.CreateTextNode(PeterUrda.age.ToString());
            XmlText GenderText =
                XMLDoc.CreateTextNode(PeterUrda.gender.ToString());

            // Add the elements into the object
            PersonToXML.AppendChild(FNameNode);
            PersonToXML.AppendChild(LNameNode);
            PersonToXML.AppendChild(AgeNode);
            PersonToXML.AppendChild(GenderNode);

            // Add the text into the elmemnts
            FNameNode.AppendChild(FNameText);
            LNameNode.AppendChild(LNameText);
            AgeNode.AppendChild(AgeText);
            GenderNode.AppendChild(GenderText);

            // Prompt the user where to save to, provide the current local
            // directory if the user wants to use a relative path.
            Console.Write("Current Local Path: \n");
            Console.WriteLine(Environment.CurrentDirectory);
            Console.Write("\nSAVE AS? "
                          + "[CAUTION: This does overwrite files!]\n"
                          + "(defaults to ..\\..\\Output.xml) > ");
            string UserPath = Console.ReadLine();

            // Nothing? Default to something.
            if (UserPath == "")
            {
                UserPath = "..\\..\\Output.xml";
            }

            // Try/Catch issues
            try
            {
                XMLDoc.Save(UserPath);
            }
            catch (Exception e)
            {
                Console.WriteLine(e.Message);
                Environment.Exit(1);
            }

            Environment.Exit(0);
        }
    }
}

First I make a generic person class to store my data in, and get it back out for the XML later. This could resemble an object we could get from a data factory or a SQL database. But it is an object nonetheless.

We then define the declaration of the document, it just states what version and encoding we are using in this specific XML file. We then use some XmlDocument methods to make sure that a root node (People in this case) is created and that our declaration is stuck right before it.

Once that is all said and done, we create a parent node, PersonToXML in this case, and add it after our root node with PrependChild.

We then use multiple lines of code create the Elements for our XML object, and the text they will contain. We use even more XmlDocument methods to add these in order to build our logical structure. Finally, we get a path from the user, catch exceptions if needed, and write the XML file.

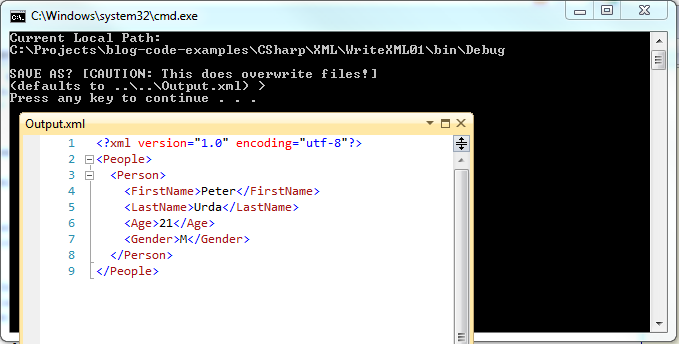
Here is the output we get when we run the program:

Program Output

The file overwrites Output.xml each time it is ran, and it produces the same results every time (surprising, I know). So be careful!

Pretty simple huh? Just add some loops or database calls, and you can be using XML for just about anything you can think of!

Read More
Solution Folders in Visual Studio 2010 Explained

If you are new to Visual Studio, you may not be familiar with how “Solution Folders” work. Visual Studio allows you to group together any number of sub-projects that your root solution may contain. However, what is strange about Solution Folders in Visual Studio is that they do not create the same logical structure on your disk. Solution Folders will not create a mirror on your hard drive. They just create a logical grouping inside your Visual Studio Project. They will not move files around, or create directories for your projects when you create Solution Folders and place your projects inside them. It is a good practice to have your logical project structure to have a one-to-one relationship with your physical directory structure, and the behavior of the Solution Folders do not follow this. But there is a way for Visual Studio to create the physical structure on the disk when adding projects to the solution.

Let’s say you have a project located at C:\VS.Projects and you have a number of other projects contained within it. Well your personal projects have become too cumbersome and are in great need of folders for grouping. You want to use Solution Folders to group them together. So you group them together, and your Visual Studio Solution structure looks nice and wonderful. You build your project, and the build succeeds as before. You are so excited you decide to go ahead and make a backup of your project for the day. After all it was a lot of work moving those projects around in the Solution Explorer!

However when you check the actual folder on your hard drive, you discover that there are no sub-folders inside C:\VS.Projects ! All the sub-projects are still lying around without any organization whatsoever. You are now frustrated that Visual Studio must have tricked you. So you go ahead and move the files around to match your structure in Visual Studio. After that is all done, you fire up Visual Studio and grab yourself a cup of coffee while it starts up.

When you return you are shocked to see your project no longer works at all. All the sub-projects are complaining that they are “Unavailable” or are unable to be read from the disk. You can’t open any of your source files, nothing is there anymore! Oh the horror!

This terrible occurrence could have easily been avoidable. So what can you do about it?

First off it is easiest to use Solution Folders right away the correct way. This article will cover that approach and let Visual Studio 2010 do all the work. So let’s create a new Console Application that we want stored in C:\VS.Projects\Test\MyApp since you are planning on writing a new application for testing.

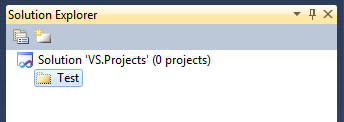
We are going to create the solution folder first, by Right-Clicking on the root of the project, then clicking ‘Add’, and then clicking ‘New Solution Folder’. We go ahead and type in ‘Test’ and so our project looks like this:

Solution Explorer

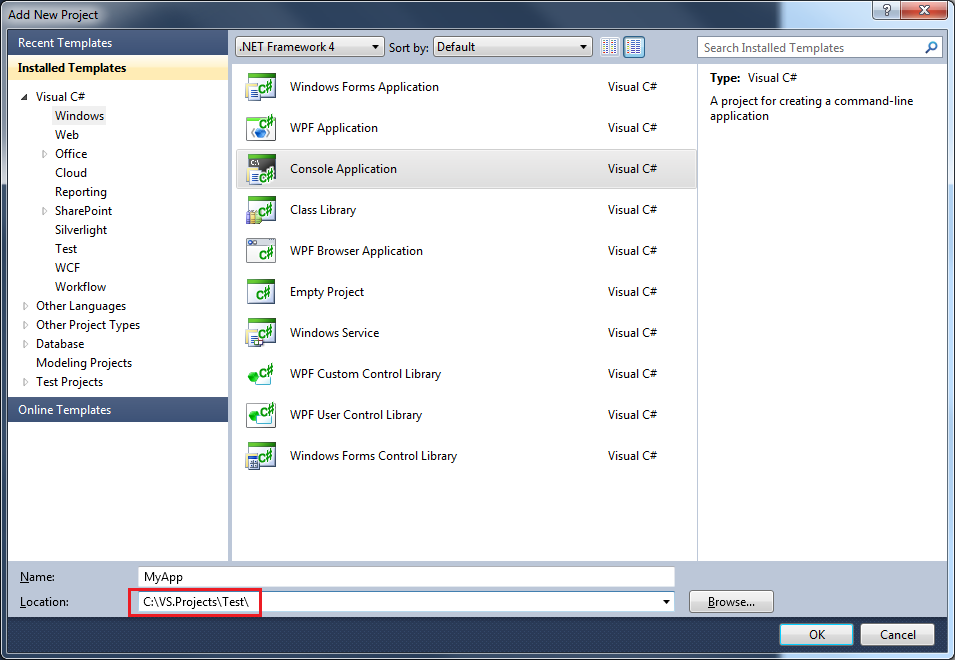
Now we will go ahead and create our Console Application inside the ‘Test’ Solution Folder. We will do that by Right-Clicking on ‘Test’, then clicking ‘Add’, and then clicking ‘New Project’. We select “Console Application” from the Visual C# - Windows templates, and we fill in ‘MyApp’ in the Name field. But do not click OK yet!

Pay attention to this critical step: We need to change the location of this project to correctly reflect our desired one-to-one relationship when it comes to comparing Solution Folders to actual physical folders on the hard drive. So we are going to tack on ‘\Test' to the end of the Location Path. This will cause Visual Studio to automatically create a sub-folder inside the VS.Projects folder named ‘Test’, and then place our new project titled ‘MyApp’ inside the new folder on the hard drive. Your project screen will look like this before you submit it:

Add New Project Dialog

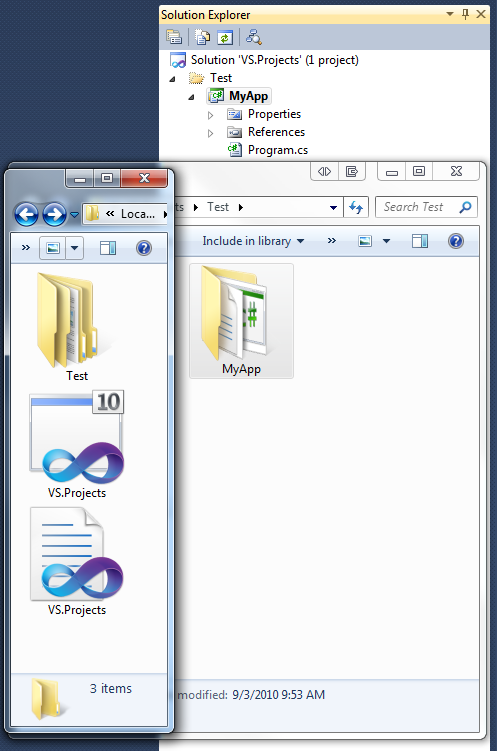
When we click ‘OK’ our new project will be setup as normal in Visual Studio. It will be placed underneath the new Solution Folder, and Visual Studio has already created the structure on the disk to mirror your project now. Here is the Solution Explorer and Windows Explorer compared for reference:

Final Result

There you go!

Now if you had already had a bunch of projects you wanted to organize, you’re best bet is to remove each project from your solution, reorganize them on your hard drive, and then re-import them inside new solutions folders. This method is not in the scope of this article, but for the experienced Visual Studio users it should be straight forward to remove and re-add your projects correctly.

So hopefully this guide helps clear up some confusion for newer users to Visual Studio when it comes to Solution Folders, and how they work.

Read More
Using LINQ to Extract Information from XML in C#

Yesterday I talked about using C# to extract information from a simple XML file. Well today we can take it one step further. Instead of using the regular XML library and commands, we can use LINQ to build a query to extract the information we desire, and place it into our object list.

In case you are not familiar with LINQ, here is a quick overview on it:

Language Integrated Query (LINQ, pronounced “link”) is a Microsoft .NET Framework component that adds native data querying capabilities to .NET languages.

LINQ defines a set of method names (called standard query operators, or standard sequence operators), along with translation rules from so-called query expressions to expressions using these method names, lambda expressions and anonymous types. These can, for example, be used to project and filter data in arrays, enumerable classes, XML (XLINQ), relational database, and third party data sources. Other uses, which utilize query expressions as a general framework for readably composing arbitrary computations, include the construction of event handlers or monadic parsers.

Source: Language Integrated Query - Wikipedia

So if we modify the previous program to use a LINQ statement instead, we can use logic and syntax that look a lot like a SQL statement. But instead of accessing a SQL database, we are instead polling an array or chunk of data. In our case we are using LINQ to run a query against a chunk of XML data.

So let’s cut to the chase, here is the modified source code from the last post:

using System;
using System.Collections.Generic;
using System.Linq;
using System.Xml.Linq;

namespace UsingXML
{
    // We establish a generic Person Class, and define necessary methods
    class PersonObject
    {
        public string fname { get; set; }
        public string lname { get; set; }
        public int age { get; set; }
        public char gender { get; set; }

        public PersonObject()
        {
            this.fname = null;
            this.lname = null;
            this.age = 0;
            this.gender = '0';
        }
        public PersonObject(string f, string l, int a, char g)
        {
            this.fname = f;
            this.lname = l;
            this.age = a;
            this.gender = g;
        }
    }

    class ReadAndLoad
    {
        // Declare a public XDocument for use
        public static XDocument XDoc;

        static void Main(string[] args)
        {
            // Prompt the user for file path, provide the current local
            // directory if the user wants to use a relative path.
            Console.Write("Current Local Path: ");
            Console.WriteLine(Environment.CurrentDirectory);
            Console.Write("Path to file? > ");
            string UserPath = Console.ReadLine();

            // Try to open the XML file
            try
            {
                Console.WriteLine("\nNow Loading: {0}\n", UserPath);
                XDoc = XDocument.Load(@UserPath);
            }
            // Catch "File Not Found" errors
            catch (System.IO.FileNotFoundException)
            {
                Console.WriteLine("No file found!");
                Environment.Exit(1);
            }
            // Catch Argument Exceptions
            catch (System.ArgumentException)
            {
                Console.WriteLine("Invalid path detected!");
                Environment.Exit(1);
            }
            // Catach all other errors, and print them to console.
            catch (Exception err)
            {
                Console.WriteLine("An Exception has been caught:");
                Console.WriteLine(err);
                Environment.Exit(1);
            }

            // Define a new List, to store the objects we pull out of the XML
            List<PersonObject> PersonList = new List<PersonObject>();

            // Build a LINQ query, and run through the XML building
            // the PersonObjects
            var query = from xml in XDoc.Descendants("Person")
                        select new PersonObject
                        {
                            fname = (string)xml.Element("FirstName"),
                            lname = (string)xml.Element("LastName"),
                            age = (int)xml.Element("Age"),
                            gender = ((string)xml.Element("Gender") == "M" ?
                                'M' :
                                'F')
                        };
            PersonList = query.ToList();

            // How many PersonObjects did we find in the XML?
            int ListSize = PersonList.Count;

            // Handle statements for 0, 1, or many PersonObjects
            if (ListSize == 0)
            {
                Console.WriteLine("File contains no PersonObjects.\n");
                Environment.Exit(0);
            }
            else if (ListSize == 1)
                Console.WriteLine("Contains 1 PersonObject:\n");
            else
                Console.WriteLine("Contains {0} PersonObjects:\n", ListSize);

            // Loop through the list, and print all the PersonObjects to screen
            for (int i = 0; i < ListSize; i++)
            {
                Console.WriteLine(" PersonObject {0}", i);
                Console.WriteLine("------------------------------------------");
                Console.WriteLine(" First Name : {0}", PersonList[i].fname);
                Console.WriteLine(" Last Name  : {0}", PersonList[i].lname);
                Console.WriteLine(" Age ...... : {0}", PersonList[i].age);
                Console.WriteLine(" Gender ... : {0}", PersonList[i].gender);
                Console.Write("\n");
            }

            // ...and we are done!
            Environment.Exit(0);
        }
    }
}

But here is where the real magic is:

// Build a LINQ query, and run through the XML building
// the PersonObjects
var query = from xml in XDoc.Descendants("Person")
    select new PersonObject
    {
        fname = (string)xml.Element("FirstName"),
        lname = (string)xml.Element("LastName"),
        age = (int)xml.Element("Age"),
        gender = ((string)xml.Element("Gender") == "M" ? 'M' : 'F')
    };
PersonList = query.ToList();

Looks a lot like SQL huh? Well what this statement is doing is grabbing all the objects in the XML that are a “Person”. It then uses an empty PersonObject and defines each of the variables in the object. There is a logic statement inside the query to set the char for the gender in each object (since you cannot cast a string to a char in this instance) based on the string retrieved from the XML.

Now for comparison, let’s look at the difference between the two sources:

--- ReadAndLoad.cs	2010-08-31 22:34:53.082425983 -0400
+++ ReadAndLoad02.cs	2010-08-31 22:34:50.682829175 -0400
@@ -1,6 +1,7 @@
 using System;
 using System.Collections.Generic;
-using System.Xml;
+using System.Linq;
+using System.Xml.Linq;

 namespace UsingXML
 {
@@ -12,6 +13,13 @@
         public int age { get; set; }
         public char gender { get; set; }

+        public PersonObject()
+        {
+            this.fname = null;
+            this.lname = null;
+            this.age = 0;
+            this.gender = '0';
+        }
         public PersonObject(string f, string l, int a, char g)
         {
             this.fname = f;
@@ -23,6 +31,9 @@

     class ReadAndLoad
     {
+        // Declare a public XDocument for use
+        public static XDocument XDoc;
+
         static void Main(string[] args)
         {
             // Prompt the user for file path, provide the current local
@@ -31,15 +42,12 @@
             Console.WriteLine(Environment.CurrentDirectory);
             Console.Write("Path to file? > ");
             string UserPath = Console.ReadLine();
-
-            // Declare a new XML Document
-            XmlDocument XmlDoc = new XmlDocument();
-
+
             // Try to open the XML file
             try
             {
                 Console.WriteLine("\nNow Loading: {0}\n", UserPath);
-                XmlDoc.Load(UserPath);
+                XDoc = XDocument.Load(@UserPath);
             }
             // Catch "File Not Found" errors
             catch (System.IO.FileNotFoundException)
@@ -61,26 +69,23 @@
                 Environment.Exit(1);
             }

-            // Declare the xpath for finding objects inside the XML file
-            XmlNodeList XmlDocNodes = XmlDoc.SelectNodes("/People/Person");
-
             // Define a new List, to store the objects we pull out of the XML
             List<PersonObject> PersonList = new List<PersonObject>();

-            // Loop through the nodes, extracting Person information.
-            // We can then define a person object and add it to the list.
-            foreach (XmlNode node in XmlDocNodes)
-            {
-                int TempAge = int.Parse(node["Age"].InnerText);
-                char TempGender = node["Gender"].InnerText[0];
-
-                PersonObject obj = new PersonObject(node["FirstName"].InnerText,
-                                                    node["LastName"].InnerText,
-                                                    TempAge,
-                                                    TempGender);
-                PersonList.Add(obj);
-            }
-
+            // Build a LINQ query, and run through the XML building
+            // the PersonObjects
+            var query = from xml in XDoc.Descendants("Person")
+                        select new PersonObject
+                        {
+                            fname = (string)xml.Element("FirstName"),
+                            lname = (string)xml.Element("LastName"),
+                            age = (int)xml.Element("Age"),
+                            gender = ((string)xml.Element("Gender") == "M" ?
+                                'M' :
+                                'F')
+                        };
+            PersonList = query.ToList();
+
             // How many PersonObjects did we find in the XML?
             int ListSize = PersonList.Count;

And just in case you were unsure about the gender logic part of the query, I ran this dataset:

<?xml version="1.0" encoding="utf-8" ?>
<People>
  <Person>
    <FirstName>Peter</FirstName>
    <LastName>Urda</LastName>
    <Age>21</Age>
    <Gender>M</Gender>
  </Person>
  <Person>
    <FirstName>Joe</FirstName>
    <LastName>White</LastName>
    <Age>30</Age>
    <Gender>M</Gender>
  </Person>
  <Person>
    <FirstName>Katie</FirstName>
    <LastName>Smith</LastName>
    <Age>25</Age>
    <Gender>F</Gender>
  </Person>
</People>

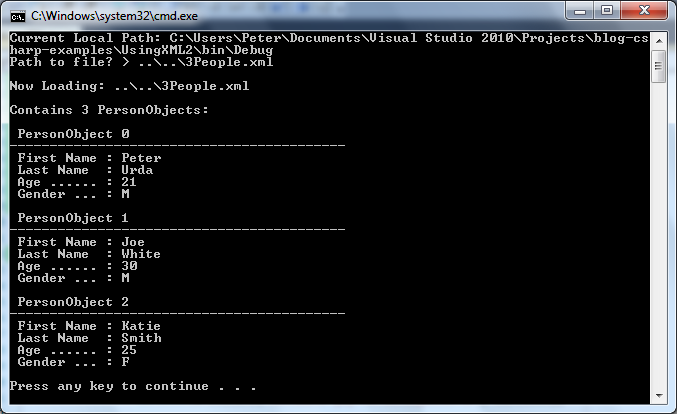
And got this result:

Program Output

Pretty sweet huh? So in review, we built a query to run against XML, and used LINQ statements and methods to retrieve each portion of data that we wanted. All of this was then shoved into a list at the end for storing. So hopefully this gives you a quick intro to start messing around with LINQ if you are inclined to do so.

Read More
Extracting Information From XML With C#

XML is a wonderful way to store information that needs to be read in by a machine or piece of software. It is simple to follow, and you can use it to store and transmit your custom data structures and information across an internet connection or in between bits of software on a local machine. C# has methods built in that can read and write XML files. So today I have put together a little program that will extract a few objects from an XML file in C# for you to see.

Say we want to store simple C# objects that describe a person. A person in our case has a first name, last name, age, and gender. So we can structure our XML file as shown below.

2People.xml:

<?xml version="1.0" encoding="utf-8" ?>
<People>
  <Person>
    <FirstName>Peter</FirstName>
    <LastName>Urda</LastName>
    <Age>21</Age>
    <Gender>M</Gender>
  </Person>
  <Person>
    <FirstName>Joe</FirstName>
    <LastName>White</LastName>
    <Age>30</Age>
    <Gender>M</Gender>
  </Person>
</People>

This XML is easy to follow, and it would be very simple for a person to just extract the information by hand in this case. But what if we had 100 Person Objects? 1,000? 1,000,000,000? It would be much easier if we could write some software to do the extraction of this information for us. If you were to write such software, it could very well look a lot like the following:

using System;
using System.Collections.Generic;
using System.Xml;

namespace UsingXML
{
    // We establish a generic Person Class, and define necessary methods
    class PersonObject
    {
        public string fname { get; set; }
        public string lname { get; set; }
        public int age { get; set; }
        public char gender { get; set; }

        public PersonObject(string f, string l, int a, char g)
        {
            this.fname = f;
            this.lname = l;
            this.age = a;
            this.gender = g;
        }
    }

    class ReadAndLoad
    {
        static void Main(string[] args)
        {
            // Prompt the user for file path, provide the current local
            // directory if the user wants to use a relative path.
            Console.Write("Current Local Path: ");
            Console.WriteLine(Environment.CurrentDirectory);
            Console.Write("Path to file? > ");
            string UserPath = Console.ReadLine();

            // Declare a new XML Document
            XmlDocument XmlDoc = new XmlDocument();

            // Try to open the XML file
            try
            {
                Console.WriteLine("\nNow Loading: {0}\n", UserPath);
                XmlDoc.Load(UserPath);
            }
            // Catch "File Not Found" errors
            catch (System.IO.FileNotFoundException)
            {
                Console.WriteLine("No file found!");
                Environment.Exit(1);
            }
            // Catch Argument Exceptions
            catch (System.ArgumentException)
            {
                Console.WriteLine("Invalid path detected!");
                Environment.Exit(1);
            }
            // Catach all other errors, and print them to console.
            catch (Exception err)
            {
                Console.WriteLine("An Exception has been caught:");
                Console.WriteLine(err);
                Environment.Exit(1);
            }

            // Declare the xpath for finding objects inside the XML file
            XmlNodeList XmlDocNodes = XmlDoc.SelectNodes("/People/Person");

            // Define a new List, to store the objects we pull out of the XML
            List<PersonObject> PersonList = new List<PersonObject>();

            // Loop through the nodes, extracting Person information.
            // We can then define a person object and add it to the list.
            foreach (XmlNode node in XmlDocNodes)
            {
                int TempAge = int.Parse(node["Age"].InnerText);
                char TempGender = node["Gender"].InnerText[0];

                PersonObject obj = new PersonObject(node["FirstName"].InnerText,
                                                    node["LastName"].InnerText,
                                                    TempAge,
                                                    TempGender);
                PersonList.Add(obj);
            }

            // How many PersonObjects did we find in the XML?
            int ListSize = PersonList.Count;

            // Handle statements for 0, 1, or many PersonObjects
            if (ListSize == 0)
            {
                Console.WriteLine("File contains no PersonObjects.\n");
                Environment.Exit(0);
            }
            else if (ListSize == 1)
                Console.WriteLine("Contains 1 PersonObject:\n");
            else
                Console.WriteLine("Contains {0} PersonObjects:\n", ListSize);

            // Loop through the list, and print all the PersonObjects to screen
            for (int i = 0; i < ListSize; i++)
            {
                Console.WriteLine(" PersonObject {0}", i);
                Console.WriteLine("------------------------------------------");
                Console.WriteLine(" First Name : {0}", PersonList[i].fname);
                Console.WriteLine(" Last Name  : {0}", PersonList[i].lname);
                Console.WriteLine(" Age ...... : {0}", PersonList[i].age);
                Console.WriteLine(" Gender ... : {0}", PersonList[i].gender);
                Console.Write("\n");
            }

            // ...and we are done!
            Environment.Exit(0);
        }
    }
}

In a nutshell this program follows a specific routine:

  • Declare a PersonObject class
  • Prompt user for a path, attempt to open the file or handle any exceptions.
  • Declare a C# list for storing the PersonObjects
  • Read in each node that matches from the XML document
  • Extract the key-value pairs and load them into the appropriate variables for each PersonObject
  • Display the results to the user, and exit

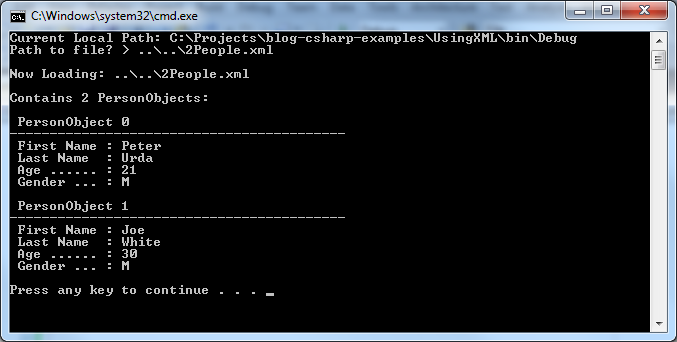
When we run the program, using the XML from above, we will see this output:

Program Output

C# has plenty more methods for reading and handling XML files and XML based information. This is just a very basic example, but it does help a lot if you are just starting to learn C# programming and XML and handling. If you are looking for some further reading, you may want to read up on the XmlDocument Class over at MSDN.

Read More
Lambda Expressions and Delegates in C#

In a previous post I discussed chaining C# delegates together. In the source code example, I created a generic DelegateMath class to house a few basic math operations. This time we will replace those functions with simpler and shorter lambda expressions.

So what exactly is a lambda expression? What does it have to do with C#? Our friends over at MSDN have this to say:

A lambda expression is an anonymous function that can contain expressions and statements, and can be used to create delegates or expression tree types.

All lambda expressions use the lambda operator =>, which is read as “goes to”. The left side of the lambda operator specifies the input parameters (if any) and the right side holds the expression or statement block. The lambda expression x => x * x is read “x goes to x times x.”

Source: Lambda Expressions (C# Programming Guide)

If we wanted to build a simple delegate using a lambda expression, it could look something like this:

delegate int del(int i);
del ADelegate = x => x * x;
int j = ADelegate(5); // j = 25

So why use lambda expression with delegates at all? First of all they can be used anywhere an anonymous delegate can be used. The defining characteristic of lambda expressions is that they can be used with expression trees (which can then be used for LINQ and SQL purposes) while anonymous delegates cannot be used with expression trees.

If we take the same example from the previous post using delegates, we can modify it to use lambda expressions instead…

using System;

namespace DelegateChainWithLambda
{
    // Declare the delegate type
    delegate void UrdaDelegate(ref int x);

    public class DelegateChainExampleWithLambda
    {
        public static void Main(string[] args)
        {
            // Create delegate objects from lambda expressions.
            UrdaDelegate delegate01 = (ref int a) => { a = a + 1; };
            UrdaDelegate delegate02 = (ref int b) => { b = b * 2; };
            UrdaDelegate delegate03 = (ref int c) => { c = c + 3; };

            // Chain the delegates together. The variable manipulation will
            // start with delegate01, then delegate02, and end with delegate03.
            UrdaDelegate DelegateChain = delegate01 + delegate02 + delegate03;

            // Define our value, and build the expected result from it
            int value = 5;
            int expected = ((value + 1) * 2) + 3;

            // Build a string for explaining the output
            string ExplanationString = "\n";
            ExplanationString += "DelegateChain(5) should produce " + expected;
            ExplanationString += " since ((" + value + " + 1) * 2) + 3 = ";
            ExplanationString += expected;

            // Pass the value into the delegate chain
            DelegateChain(ref value);

            // ...and write the explanation and result to console!
            Console.WriteLine(ExplanationString);
            Console.WriteLine("RESULT: " + value + "\n");
        }
    }
}

…and when we run the program we get this output:

Program Output

We still get the exact same output (cool story, I know) however we have removed the need for the math class, and made the code a little easier to follow.

Read More
Delegate Chain of Command

Another cool thing about delegates is the ability to chain them together. Say for example you have an object modification process, and you need a given object to be manipulated in a very specific order. Well you could use a delegate chain to accomplish that. For a simple example I have written up a C# delegate chain program that evaluates a mathematical expression following the order of operations by using a delegate chain.

using System;

namespace DelegateChain
{
    // Declare the delegate type
    delegate void UrdaDelegate(ref int x);

    // A general class to store methods for use by delegates
    public class DelegateMath
    {
        public static void AddOne(ref int a)
        {
            a = a + 1;
        }
        public static void TimesTwo(ref int b)
        {
            b = b * 2;
        }
        public static void PlusThree(ref int c)
        {
            c = c + 3;
        }
    }

    public class DelegateChainExample
    {
        public static void Main(string[] args)
        {
            // Create delegate objects based on our created methods.
            UrdaDelegate delegate01 = new UrdaDelegate(DelegateMath.AddOne);
            UrdaDelegate delegate02 = new UrdaDelegate(DelegateMath.TimesTwo);
            UrdaDelegate delegate03 = new UrdaDelegate(DelegateMath.PlusThree);

            // Chain the delegates together. The variable manipulation will
            // start with delegate01, then delegate02, and end with delegate03.
            UrdaDelegate DelegateChain = delegate01 + delegate02 + delegate03;

            // Define our value, and build the expected result from it
            int value = 5;
            int expected = ((value + 1) * 2) + 3;

            // Build a string for explaining the output
            string ExplanationString = "\n";
            ExplanationString += "DelegateChain(5) should produce " + expected;
            ExplanationString += " since ((" + value + " + 1) * 2) + 3 = ";
            ExplanationString += expected;

            // Pass the value into the delegate chain
            DelegateChain(ref value);

            // ...and write the explanation and result to console!
            Console.WriteLine(ExplanationString);
            Console.WriteLine("RESULT: " + value + "\n");
        }
    }
}

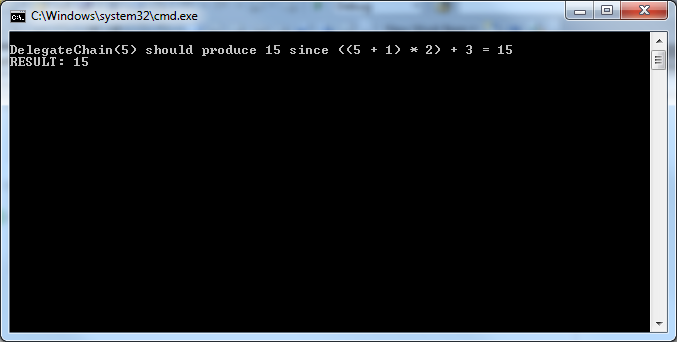
…and when we run the program we get this output:

Program Output

Sure you could have just performed the mathematical expression by itself without writing all of that code. But the point is you are able to link delegates together, and perform manipulation on a given variable at each function in a specific order. This can be dragged out to more complex methods, where ordered execution is mission critical.

Read More
Testing and You

Today marked the beginning of my real co-op experience and work tasks here at Mercer. The morning started off with a conference call with dev-team members from China, India, and the rest of us here in Louisville via teleconferencing. The reason for the meeting was to demo the new features and functionality of the latest release for a Mercer product. Deployment will be occurring later this week, but before that could happen some last minute testing needed to be done.

I had the opportunity to get a rundown of the internals of the product, and from there performed testing on a new file manager to check for any missed bugs or problems. Throughout all of this I learned how Mercer developed any project starting from conception, to testing, and final delivery to production. While no single step is an easy task, Mercer’s method produces undeniable results and amazing software.

Read More