Being able to drop certain chunks of code from one piece of software to another piece of unrelated software is a powerful thing. Not only does this save time, but it will also allow you to build a small library of tools you find useful in all your applications. Interfaces in C# is just one of many ways to build more modular objects that have similar behavior.
We are going to create an interface IHuman to build people objects from. Everyone can agree that all people have a First Name, Last Name, Age, and have some ability to speak. So we will wrap that up into a neat interface.
public interface IHuman
{
    string fname { get; set; }
    string lname { get; set; }
    int age { get; set; }

    void Speak(string input);
}
An interface is a very basic chunk of code in C#. It is like a checklist of objects and actions that all derived classes should have. The way each class handles each dimension of the IHuman will be unique to each class. So now we will create just a basic person object from the interface. I will then use Visual Studio to implement the interface, and this will be the result:
public class Person : IHuman
{
    public string fname
    {
        get
        {
            throw new NotImplementedException();
        }
        set
        {
            throw new NotImplementedException();
        }
    }

    public string lname
    {
        get
        {
            throw new NotImplementedException();
        }
        set
        {
            throw new NotImplementedException();
        }
    }

    public int age
    {
        get
        {
            throw new NotImplementedException();
        }
        set
        {
            throw new NotImplementedException();
        }
    }

    public void Speak(string input)
    {
        throw new NotImplementedException();
    }
}
As you can tell, you’ll need to go through each method and implement it for use. I simply took a moment to do some clean up, and added logic to my Speak method:
public class Person : IHuman
{
    public string fname
    {
        get;
        set;
    }

    public string lname
    {
        get;
        set;
    }

    public int age
    {
        get;
        set;
    }

    public void Speak(string input)
    {
        Console.WriteLine(input);
    }
}
Now I can build a simple program and declare a Person Object. Then I can set variables within the object and/or use any of the methods associated with it. Yet, I need another object to describe a programmer. Again, I’ll use the IHuman interface and make the needed changes to my methods. I’m also adding a custom method in this class as another way to speak.
public class Programmer : IHuman
{
    public string fname
    {
        get;
        set;
    }

    public string lname
    {
        get;
        set;
    }

    public int age
    {
        get;
        set;
    }

    public void Speak(string input)
    {
        string result = "";

        foreach (string s in input.Select(c => Convert.ToString(c, 2)))
        {
            result += s;
        }

        Console.WriteLine(result);
    }

    public void DudeInPlainEnglish(string input)
    {
        Console.WriteLine("Sorry my bad... " + input);
    }
}
If you pull the interface and two objects together, you can build a simple console application to prove this proof of concept:
static void Main(string[] args)
{
    Person MyPerson = new Person();
    MyPerson.fname = "John";
    MyPerson.lname = "Smith";
    MyPerson.age = 25;

    MyPerson.Speak(string.Format("Hello I am {0} {1}!",
                                 MyPerson.fname,
                                 MyPerson.lname));

    Console.WriteLine();

    Programmer Me = new Programmer();
    Me.fname = "Peter";
    Me.lname = "Urda";
    Me.age = 21;
    string UrdaText
        = string.Format("Hey, I'm {0} {1}", Me.fname, Me.lname);

    Me.Speak(UrdaText);
    Console.WriteLine();

    Me.DudeInPlainEnglish(UrdaText);
    Console.WriteLine();
}
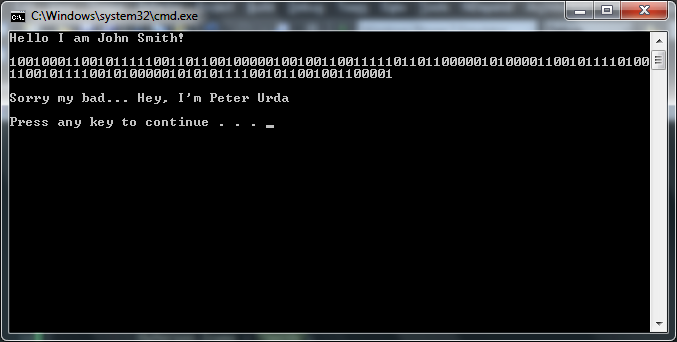
Running the program will produce this output:
As you can tell the Programmer spits out binary when asked to speak, and it is only when you call the DudeInPlainEnglish method against it is when you get a readable format. The method also appends “Sorry my bad…” to the start of the print out.
If we only had access to the interface, we would know what properties and methods that each class must have when using said interface. Think of this interface as a type of contract, where each class that uses it must (in some fashion) use the properties and methods laid out. You can also think of an interface as a very basic framework for all involved classes.
So the next time you are working on a bunch of objects that are closely related to each other, consider using an interface.
When you create a basic WCF service hosted through IIS, you are greeted with a generic page informing you that “You Have Created a Service”. This is useful since it provides to the developer two critical pieces of information. First it lets you know that the service is up and running, second it provides basic code stubs to query the service with. While this may be fine for development, you might not want to display this page in production. Disabling it is not intuitive, but with some searching through the MSDN documentation I have found the preferred way of changing this page.
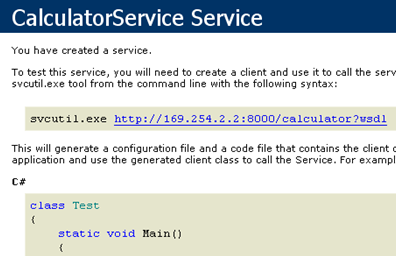
When you first setup a service, you’ll see this screen when you visit the service URL:
To disable the HTML “You Have Created a Service” page for your WCF services, simply add this XML inside your Web.config file as a child of configuration
<system.serviceModel>
    <behaviors>
        <serviceBehaviors>
            <behavior>
                <serviceDebug httpHelpPageEnabled="false"
                              httpsHelpPageenabled="false" />
            </behavior>
        </serviceBehaviors>
    </behaviors>
</system.serviceModel>
This block of XML will then cause the raw XML information to be displayed instead of the generic “You Have Created a Service” page. You can fine tune the behavior even more, so you may want to reference MSDN for more information.
So you have your program written out, and you have met all your goals. You are so confident that the program is ready, you rip out the debug statements and other debugging related functionality from it. You fire up the program and feed it the initial values and BAM nothing works! If only you kept the debug calls! Well you can avoid this in the future by using conditions in your code.
If you have ever worked on a complex C# application, you may have seen code such as the following:
#if DEBUG
debug.PrintStackTrace();
#endif
You would have these block in your program everywhere you made a call to the debug class. This adds extra lines to our source code, and can cause issues when you have to make changes to debug handling.
But there is a more elegant way of enabling or disabling debugging. We can add
conditionals to our methods based on the build environment. So let’s say we have
a debug class with the method named PrintStackTrace. This simply prints
out some stack trace where ever it has been requested. Instead of surrounding
each method call with #if and #endif we will add a line before our method in the
debug class (look at the highlighted line):
// debug class...

[Conditional("DEBUG")]
public void PrintStackTrace()
{
    /* Method code would be here */
}

// Main, or other class...

/* And simply call it normally */
debug.PrintStackTrace();
So now all you have to do is make the call to the method when you like by simply building in DEBUG mode. When we switch to release, the code is stripped out and ignored as if it never existed. If you use the first method, you are adding at least two extra lines to every debug call in your program. This can rapidly increase the length of your source code. Instead the second method only costs an extra line before each method you are using for debugging. Plus, it looks a lot cleaner without all the #if/#endif statements!
There are a few situations where a C# structure will provided better performance than a C# class and other times a class will be faster than a structure. The reason for this is how C# is handling both of these in memory during program execution.
Let’s talk about classes first. A class in C# is a reference type. This means that C# creates references, or pointers, to values in memory for each part of the object. When you copy a C# class you are making a copy of the references to values in memory. Structures have a different behavior than this.
Structures behave like a value type much like an int or a bool. These types are based on values in memory directly, there are no pointers or references in between. These types are said to run on the metal since they do not use references.
Knowing these two bits of crucial information, you can modify some class objects into structures and gain a good performance boost. However, you must make these decisions carefully since a bad implementation of structure will actually cause slower performance. Thankfully we have MSDN to show us a few guidelines on structure uses:
✓ CONSIDER defining a struct instead of a class if instances of the type are small and commonly short-lived or are commonly embedded in other objects.
X AVOID defining a struct unless the type has all of the following characteristics:
- It logically represents a single value, similar to primitive types (int, double, etc.).
- It has an instance size under 16 bytes.
- It is immutable.
- It will not have to be boxed frequently.
In all other cases, you should define your types as classes.
Source: MSDN
All of those points make sense. If something is going to be a structure it should represent a single value (like the other primitive types), it has a small memory footprint, it is immutable (again like the other primitive types), and will not be boxed/unboxed a lot inside other portions of your program. If you cannot meet these key requirements, you should be using a class instead of a structure.
The next time you think you can represent a chunk of information as a structure, you should take a moment and check the requirements. If you do not check for these key points, then your performance will suffer down the road as your application scales out.
As I worked on another project today, I came across a simple dilemma. The project reads in a small Microsoft Access database (also known as a .mdb file) into memory. It then queries said database with a simple ‘SELECT foo FROM bar…‘ statement and pulls the results into the program. However, if you load an Access database that does not follow the expected schema, the program throws a nasty error and causes some logic interruption. I needed a simple way to check for a few table names before proceeding, so I whipped up a simple C# method.
It basically checks to see if the file path to the Access database is available. If it is available it checks the schema inside the database for the given table name. If found, the boolean variable will be set to true. If not, the method will return false.
See if you can follow along with comments in the code:
public bool DoesTableExist(string TableName)
{
    // Variables availbe to the method, but not defined here are:
    // SomeFilePath (string)

    // Variable to return that defines if the table exists or not.
    bool TableExists = false;

	// If the file path is empty, no way a table could exist!
    if (SomeFilePath.Equals(String.Empty))
    {
        return TableExists;
    }

    // Using the Access Db connection...
    using (OleDbConnection DbConnection
           = new OleDbConnection(GetConnString(SomeFilePath)))
    {
        // Try the database logic
        try
        {
            // Make the Database Connection
            DbConnection.Open();

            // Get the datatable information
            DataTable dt = DbConnection.GetSchema("Tables");

            // Loop throw the rows in the datatable
            foreach (DataRow row in dt.Rows)
            {
                // If we have a table name match, make our return true
                // and break the looop
                if (row.ItemArray[2].ToString() == TableName)
                {
                    TableExists = true;
                    break;
                }
            }
        }
        catch (Exception e)
        {
            // Handle your ERRORS!
        }
        finally
        {
            // Always remeber to close your database connections!
            DbConnection.Close();
        }
    }

    // Return the results!
    return TableExists;
}
Feel free to integrate this into your project, this may come in handy with one of your future projects!
Enumerations in C# allow you to group common constants together inside a piece of code. They are often used for determining a system state, flag state, or other constant conditions throughout the program. Usually enums are not formatted for “pretty” displaying to the end user. However you can use a little C# magic to make them behave better with descriptions!
In order to add descriptions to the desired enum, you’ll need to declare using System.ComponentModel; at the top of your source file. This will help with simplifying the definitions later on. So first let’s lay out an enum:
enum MyColors
{
    White,
    Gray,
    Black
}
Now we just add the description parameter before each portion of the enum:
enum MyColors
{
    [Description("Eggshell White")]
    White,

    [Description("Granite Gray")]
    Gray,

    [Description("Midnight Black")]
    Black
}
Now we will need to construct an extension method for accessing these new descriptions.
public static class EnumExtensions
{
    public static string GetDescription(this Enum value)
    {
        var type = value.GetType();
        var field = type.GetField(value.ToString());
        var attributes = field.GetCustomAttributes(typeof(DescriptionAttribute), false);
        return attributes.Length == 0 ? value.ToString() : ((DescriptionAttribute)attributes[0]).Description;
    }
}
Basically, this method has the following workflow:
- Grab the enum type
- Get the actual field value
- Grab our custom attribute “Description”
- Finally, check to make sure we got a value.
- If we didn’t, just return the string of the enum value
- If we did, return the Description attribute.
All you have to do now is loop through the enum to prove the code:
for (MyColors i = MyColors.White; i <= MyColors.Black; i++)
    Console.WriteLine(i.GetDescription());

/*
Eggshell White
Granite Gray
Midnight Black
*/
This could be very useful if you want to pull something for a XAML binding, and not try to format an enum at runtime! You also will only have to keep the description in one place, and that is with the actual enum value itself.
There will be times when you are using a third-party library or some other “black box” software in your project. During those times you may need to add functionality to objects or classes, but that addition does not necessarily call for employing inheritance or some other subclass. In fact, you might not have access to the library’s source code if it is proprietary. There is a wonderful feature of C# though that allows you to add-on commonly used methods to any type of object, and that feature is called Extension Methods
Extension methods are a simple way of adding common functionality to a given object in C#. It is usually faster than trying to build a new subclass from the original class and it makes your code a lot more readable. MSDN has a wonderful explanation of extension methods:
Extension methods enable you to “add” methods to existing types without creating a new derived type, recompiling, or otherwise modifying the original type. Extension methods are a special kind of static method, but they are called as if they were instance methods on the extended type. For client code written in C# and Visual Basic, there is no apparent difference between calling an extension method and the methods that are actually defined in a type.
Source: MSDN
To create an extension method, you must use this syntax:
public static return-type MethodName(this ObjectType TheObject, ParamType1 param1, ..., ParamTypeN paramN)
{
    /* Your actual method code here */
}
Notice the all important this ObjectType TheObject inside the parameter list? Well this needs to match what object is actually calling it. So if you are making an extension method for a string, your first parameter will read this string YourDesiredStringName. In short: ObjectType is the name of the type that you are creating the extension method and will be stored inside TheObject property for use in the method. Any extra parameters such as param1 and so on are optional and can be used inside your method also.
So take a look at the simple sample I have created. Notice I am calling in the namespace that contains the extensions in my main namespace, and thanks to that my int object can call all the methods naturally:
using System;

namespace MainProgram
{
    // Call in UrdaExtensions namespace so we can access the extension methods
    using UrdaExtensions;

    class MainProgram
    {
        public static void Main()
        {
            int MyNum = 21;
            Console.WriteLine("MyNum = {0}\n", MyNum);
            Console.WriteLine("MyNum.Cube()     : " + MyNum.Cube());
            Console.WriteLine("MyNum.FlipInt()  : " + MyNum.FlipInt());
            Console.WriteLine("MyNum.ShiftTwo() : " + MyNum.ShiftTwo());
        }
    }
}

namespace UrdaExtensions
{
    public static class UrdaExtensionClass
    {
        #region Extension Methods

        public static int Cube(this int value)
        {
            return value * value * value;
        }

        public static int FlipInt(this int value)
        {
            char[] CharArray = value.ToString().ToCharArray();
            Array.Reverse(CharArray);
            return int.Parse(new string(CharArray));
        }

        public static int ShiftTwo(this int value)
        {
            return value + 2;
        }

        #endregion
    }
}

/*
Program prints this to screen at runtime:

MyNum = 21

MyNum.Cube()     : 9261
MyNum.FlipInt()  : 12
MyNum.ShiftTwo() : 23
Press any key to continue . . .
*/
Thanks to extension methods, I do not have to make a call that looks something like MyUtilityObject.Cube(MyNum). Instead I can make a better method call straight from the int object. This makes life easier for all involved since the code will be much simpler to read and it allows for better code re-usability.
As you work through various projects in Visual Studio 2010 you will find yourself reusing a lot of code. In fact, you may find yourself reusing a lot of the same static code, or code that follows a basic pattern. Visual Studio 2010 lets you cut out a lot of this wasted time by employing code snippets. Code snippets can generate basic code patterns or layouts on the fly inside your project. Today I will walk you through creating a basic code snippet for generating a C# class with specific section stubs.
You will need to start with a generic XML file. You’ll want to keep the XML declaration line inside the file once you create it and change the file extension from .xml to .snippet. For reference I store my stubs inside “C:\Users\Peter\Documents\Visual Studio 2010\Code Snippets\Visual C#\Custom”
Now we can go ahead our XML stub! We will first fill out the required schema information:
<?xml version="1.0" encoding="utf-8"?>

<CodeSnippets xmlns="http://schemas.microsoft.com/VisualStudio/2005/CodeSnippet">
  <CodeSnippet Format="1.0.0">

    <!-- Come with me, and you'll be... -->

  </CodeSnippet>
</CodeSnippets>
Now we are ready to fill out our header information. The header is used to define things such as the title of the snippet, the author, the shortcut for IntelliSense , and a description. The header will also define the snippet type (you can read all about the options of snippet type here) that the snippet will act as. So we will fill out our header now:
<?xml version="1.0" encoding="utf-8"?>

<CodeSnippets xmlns="http://schemas.microsoft.com/VisualStudio/2005/CodeSnippet">
  <CodeSnippet Format="1.0.0">
    <Header>
      <Title>Build Class With #regions</Title>
      <Author>Peter Urda</Author>
      <Shortcut>BuildClassWithRegions</Shortcut>
      <Description>Creates a Class With Common #region Sections</Description>
      <SnippetTypes>
        <SnippetType>Expansion</SnippetType>
      </SnippetTypes>
    </Header>

    <!-- ...in a world of pure imagination... -->

  </CodeSnippet>
</CodeSnippets>
Our next element, which will also be a child of the CodeSnippet element, will define the properties of the actual snippet to be inserted. Now for this example I wanted to be able to replace a single chunk of the snippet when I call the snippet from Visual Studio. This will require the addition of a Declarations section that will control this behavior.
The declaration section can either contain an Object type or a Literal type. We will be covering the Literal type in this example. The literal has an ID, ToolTip, and a Default value. The ID is used by the snippet for where the actual replacement occurs. The ToolTip tag will be used by IntelliSense to give the end-user a hint as to the purpose of the code section that is being worked on. Finally, a default value is declared to be displayed before the user makes the change.
We will go ahead and fill the section out now:
<?xml version="1.0" encoding="utf-8"?>

<CodeSnippets xmlns="http://schemas.microsoft.com/VisualStudio/2005/CodeSnippet">
  <CodeSnippet Format="1.0.0">
    <Header>
      <Title>Build Class With #regions</Title>
      <Author>Peter Urda</Author>
      <Shortcut>BuildClassWithRegions</Shortcut>
      <Description>Creates a Class With Common #region Sections</Description>
      <SnippetTypes>
        <SnippetType>Expansion</SnippetType>
      </SnippetTypes>
    </Header>

    <Snippet>
      <Declarations>
        <Literal>
          <ID>ClassName</ID>
          <ToolTip>Replace with the desired class name.</ToolTip>
          <Default>ClassName</Default>
        </Literal>
      </Declarations>

      <!-- ...take a look and you'll see into your imagination... -->

    </Snippet>
  </CodeSnippet>
</CodeSnippets>
Now we can fill out the final section that will contain the actual code generated by the snippet. We will go ahead and declare that this code is for C#, and create the required tags before we start entering in our code:
<?xml version="1.0" encoding="utf-8"?>

<CodeSnippets xmlns="http://schemas.microsoft.com/VisualStudio/2005/CodeSnippet">
  <CodeSnippet Format="1.0.0">
    <Header>
      <Title>Build Class With #regions</Title>
      <Author>Peter Urda</Author>
      <Shortcut>BuildClassWithRegions</Shortcut>
      <Description>Creates a Class With Common #region Sections</Description>
      <SnippetTypes>
        <SnippetType>Expansion</SnippetType>
      </SnippetTypes>
    </Header>

    <Snippet>
      <Declarations>
        <Literal>
          <ID>ClassName</ID>
          <ToolTip>Replace with the desired class name.</ToolTip>
          <Default>ClassName</Default>
        </Literal>
      </Declarations>

      <Code Language="CSharp">
        <![CDATA[
        /*
        ...we'll begin with a spin traveling in the world of my creation...
        */
        ]]>
      </Code>
    </Snippet>
  </CodeSnippet>
</CodeSnippets>
We will being to enter the code our snippet will generate inside this last section. All the code to be generated by the snippet needs to be placed between the <![CDATA[ and
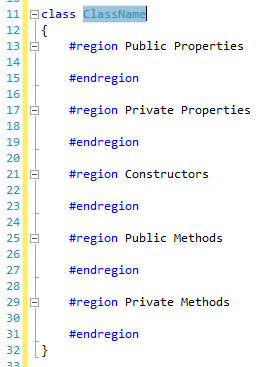
]]> tags. If you fail to do so, your snippet will not work. We also want to call back to the literal declaration we made inside the code. To do this we simply surround the name of the literal with the $ symbol. You should be able to deduce what the snippet will generate from the complete snippet file below:
<?xml version="1.0" encoding="utf-8"?>

<CodeSnippets xmlns="http://schemas.microsoft.com/VisualStudio/2005/CodeSnippet">
  <CodeSnippet Format="1.0.0">
    <Header>
      <Title>Build Class With #regions</Title>
      <Author>Peter Urda</Author>
      <Shortcut>BuildClassWithRegions</Shortcut>
      <Description>Creates a Class With Common #region Sections</Description>
      <SnippetTypes>
        <SnippetType>Expansion</SnippetType>
      </SnippetTypes>
    </Header>

    <Snippet>
      <Declarations>
        <Literal>
          <ID>ClassName</ID>
          <ToolTip>Replace with the desired class name.</ToolTip>
          <Default>ClassName</Default>
        </Literal>
      </Declarations>

      <Code Language="CSharp">
        <![CDATA[class $ClassName$
        {
            #region Public Properties

            #endregion

            #region Private Properties

            #endregion

            #region Constructors

            #endregion

            #region Public Methods

            #endregion

            #region Private Methods

            #endregion
        }]]>
      </Code>
    </Snippet>
  </CodeSnippet>
</CodeSnippets>

<!-- ...what we'll see will defy explanation. -->
So after all this work we still need to tell Visual Studio 2010 where to find this snippet file. To do this we will need to open the Code Snippets Manager from Tools -> Code Snippets Manager… or with the default keyboard shortcut CTRL+K, CTRL+B inside Visual Studio. Once that is open you may need to reference your custom folder (Mine was at “C:\Users\Peter\Documents\Visual Studio 2010\Code Snippets\Visual C#\Custom” for reference) using the “Add..” button. You can then click do the following:
- Click “Import…”
- Browse to the location of your snippet
- Select the folder you would like Visual Studio to store said snippet (I used my “Custom” folder)
- ..and your done!
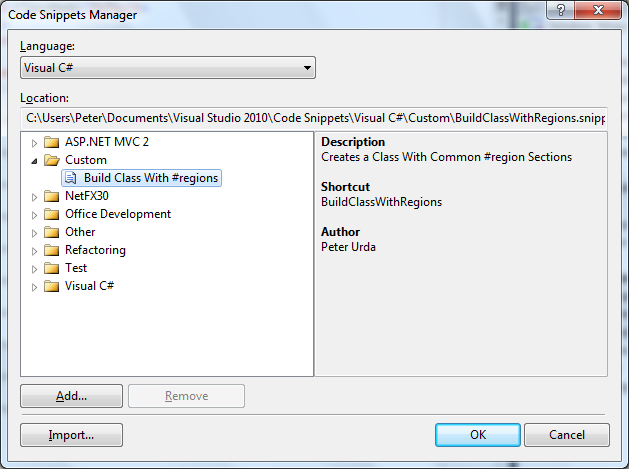
If you take a peak back at the main Code Snippets Manager window and find your new snippet you’ll be presented with a screen detailing the information from the header section:
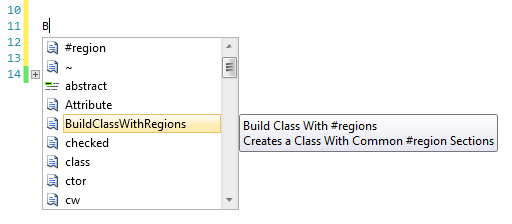
So now just jump back to your C# project and you should be able to just type ‘b’ or ‘B’ for IntelliSense to prompt you with the following:
Like any other snippet (such as prop) a double tab after that point will fill out the code and jump your cursor to the class name for you to rename:
For further reading MSDN has plenty of information on creating advanced snippets. You can find said information by visiting this link. So what are you waiting for? Go make your coding life easier!
Everyone knows how amazing XAML is to create flexible and beautiful GUI’s for various applications. XAML provides a wonderful interface to building a simple grid of data (much like an Excel spreadsheet) with the DataGrid namespace. I was working on a DataGrid object in one of my projects today, and chose to re-work the XAML into a better form for easier reading and code re-use. I however stumbled into a strange characteristic of the Datagrid, and I wanted to share with you that issue and the fix I came up with.
So here is the XAML I came up with to display a simple grid in my application:
<DataGrid x:Name="SomeDataGrid" ItemsSource="{Binding}"
                DataContext="{Binding}" AutoGenerateColumns="False"
                CanUserAddRows="False" CanUserDeleteRows="False"
                HeadersVisibility="Column"
                AlternatingRowBackground="LightGray" >
    <data:DataGrid.Columns>
		<data:DataGridCheckBoxColumn
            Header="Include?"
            Width="55"
            CanUserResize="False"
            Binding="{Binding Path=IsIncluded, Mode=TwoWay}" />
        <data:DataGridTextColumn
            Header="ID"
            MinWidth="22"
            Width="SizeToCells"
            Binding="{Binding Path=SystemNumber, Mode=OneWay}" />
        <data:DataGridTextColumn
            Header="Question Text"
            MinWidth="85"
            Width="SizeToCells"
            Binding="{Binding Path=Text, Mode=OneWay}" />
    </data:DataGrid.Columns>
</data:DataGrid>
The issue that arose was centered around the checkbox column. The new checkbox column required the user to first make a row active (by clicking on it) to then have to click a second time to enable or disable the desired checkbox. Obviously this is not the desired action, since a user expects to be able to just check a box without having to select the row first.
So how do we correct the issue. Well instead of just using a plain DataGridCheckBoxColumn we will declare a template column instead. We can then define within this template the actions and styling of this column. Below is my updated XAML section for the first column:
<!-- XAML Omitted -->

<data:DataGridTemplateColumn
	Header="Include?"
	Width="55"
	CanUserResize="False">
	<data:DataGridTemplateColumn.CellTemplate>
		<DataTemplate>
			<Grid>
				<CheckBox
					IsChecked="{Binding Path=IsIncluded, Mode=TwoWay}"
					ClickMode="Press"
					HorizontalAlignment="Center"
					VerticalAlignment="Center" />
			</Grid>
		</DataTemplate>
	</data:DataGridTemplateColumn.CellTemplate>
</data:DataGridTemplateColumn>

<!-- XAML Omitted -->
The ClickMode=”Press” will allow the box to be checked when the mouse is hovered over it and a click event is caught. This allows for our desired action, while still keeping clean and organized XAML!
Hopefully this may come in handy if you are pulling your hair out over DataGrid columns. I know I’ll end up referring back to this note sometime in the future.
