Follow Up on IIS Services, 504s, and Fiddler

The other day I posted an article discussing my issue tracking down a bug in a ClickOnce application. I had noted that once I made a change to maxRequestLength in my web.config file the issue went away. Well, that change was not the real solution.

While the maxRequestLength does help the application pull down the query at times, it was not what corrected the original problem! This morning as I was continuing to work on the application, I had gotten the same 504 error (which by the way you can read the original article here) I thought I had corrected. Since IIS was not sending me any vital information other than the 504 timeout I had to find another way to catch the bug.

I had to add another entry into my web.config file to catch any possible errors my services were throwing out that were not being logged in IIS or Fiddler. Sure enough, I was able to log a trace that showed me the root of the 504 problem. Before I tell you what the problem was with my program, I would like to take you through build a tracer similar to the one I used.

Let’s start building our tracer. First we drop into a system.diagnostics block. The system.diagnostics block is in charge of catching various trace messages and outputting them somewhere of our choosing, so it will contain child tags that will control how it operates. For reference, you can read all about the system.diagnostics namespace on MSDN.

<system.diagnostics>
    <!--
    (Here be dragons)
    -->
</system.diagnostics>

Now we will add another line to our XML snippet. The trace tag, with the property of autoflush=”true” is a class in charge of tracing through methods in your code. Autoflush will define if flush is called after every write (if it is set to true; see the link for the full MSDN specifications). So now our XML looks as so:

<system.diagnostics>
    <trace autoflush="true" />
    <!--
    (Here be dragons)
    -->
</system.diagnostics>

So now we step down into our sources, and define a source for diagnostics. In this case our source will have a name of “System.ServiceModel”. This is defined on MSDN as:

System.ServiceModel: Logs all stages of WCF processing, whenever configuration is read, a message is processed in transport, security processing, a message is dispatched in user code, and so on.

Source: https://msdn.microsoft.com/en-us/library/ms733025.aspx

We then define our switchValue, which will capture any messages matching the values. Possible values are:

  • Off
  • Critical
  • Error
  • Warning
  • Information
  • Verbose
  • ActivityTracing
  • All
  • …more details on each level can be found on MSDN

In this case we want to catch message that are “Information” or “ActivityTracing” operations. The propagateActivity setting determines whether the activity should be followed to other endpoints that take part in the exchange. By setting this to true, you can take trace files generated by any two endpoints and see how a set of traces on one end flowed to a set of traces on another end. Our XML now looks like this:

<system.diagnostics>
    <trace autoflush="true" />
    <sources>
        <source name="System.ServiceModel" switchValue="Information, ActivityTracing" propagateActivity="true">
            <!--
            (Here be dragons)
            -->
        </source>
    </sources>
</system.diagnostics>

We are almost done defining the XML for our trace operations. Now we just need to add the actual listener that will catch anything that is sent from the source we defined. We will add an XmlWriterTraceListener to save the information back to something. We will be naming it “std”, defining the listener as System.Diagnostics.XmlWriterTraceListener, and we instruct it to save a file to the website root as “Server.e2e”. Our XML for tracing is now complete!

<system.diagnostics>
    <trace autoflush="true" />
    <sources>
        <source name="System.ServiceModel" switchValue="Information, ActivityTracing" propagateActivity="true">
            <listeners>
                <add name="sdt" type="System.Diagnostics.XmlWriterTraceListener" initializeData="Server.e2e"/>
            </listeners>
        </source>
    </sources>
</system.diagnostics>

We then go back to the application (after recycling the App Pool in IIS that hosts the application at fault), launch the ClickOnce program, and trigger the error to occur. When the error finally does occur all you have to do is pull down the file the listener wrote to (in our case Server.e2e) and open it up with the Microsoft Service Trace Viewer which is located in All Programs -> Visual Studio 2010 -> Microsoft Windows SDK Tools. You should see any errors that are occurring, and hopefully the one that you need to know to correct the problem!

After I had my output opened in the Service Trace Viewer I found the original problem. In my case the problem was listed as:

EXCEPTION TYPE:
System.Data.OracleClient.OracleException, System.Data.OracleClient,
  Version=4.0.0.0, Culture=neutral, PublicKeyToken=xxxxx

MESSAGE:
ORA-12154: TNS:could not resolve the connect identifier specified

My application was dying off because IIS was not able to return a result to it. The reason IIS was unable to return an invalid result was caused by an Oracle database not returning any data. In our QA environment at Mercer, we have a clustered Oracle database configuration. When IIS made a query to the Oracle cluster, it had a 50/50 chance of hitting a server that did not want to respond. This is why the application worked some of the time and then would crash other times.

The quick fix? Tell the application to only hit the good Oracle server.

The long-term, correct fix to make? Obviously get the Oracle cluster in QA corrected. Then rebuild the service in IIS to understand this type of error, and relay back a better message to the client. The client ClickOnce application will then need to understand this new message, and throw up an error message instead of locking up.

Hopefully this article is of use to understanding how to trace events in your applications and/or provide another viewpoint to use when you have an intermittent issue like I ran into.
Read More
IIS Services, 504s, and Fiddler

I have been tracking a random issue in one of our projects here at Mercer. It is a simple ClickOnce application, with a handful of hosted services through an IIS website. When I worked on the tool in my local development environment everything worked fine. When I deployed the tool to QA for testing it completely broke at a single point in the application for our QA team in India. The tool worked fine here in Louisville, with the exception of this morning where I was able to reproduce the problem.

ATTENTION! The actual problem was found later on and is detailed here.

With the problem triggering locally, I started up Fiddler on my program. In case you have never heard of Fiddler it is a wonderful tool to track HTTP requests entering and exiting your computer. From the official Fiddler website:

Fiddler is a Web Debugging Proxy which logs all HTTP(S) traffic between your computer and the Internet. Fiddler allows you to inspect all HTTP(S) traffic, set breakpoints, and “fiddle” with incoming or outgoing data. Fiddler includes a powerful event-based scripting subsystem, and can be extended using any .NET language.

Fiddler is freeware and can debug traffic from virtually any application, including Internet Explorer, Mozilla Firefox, Opera, and thousands more.

Source: https://www.fiddler2.com/fiddler2/

When I performed the action that caused the application to lock up (in this case hit a service on IIS to pull down a list from a database), Fiddler treated me with this error message:

HTTP/1.1 504 Fiddler - Receive Failure
Content-Type: text/html
Connection: close
Timestamp: XX:XX:XX.XXX

ReadResponse() failed: The server did not return a response for this request.

This had me lost, I was not sure why the server would be kicking back a 504 timeout error. I was able to get access to the service at its endpoint URL and I was able to use svcutil.exe to build generated stubs for C# off it. The logs in IIS also did not give me any further information. What I did know is that when a request for information came from the ClickOnce application, it would be unable to pull in any results right after Fiddler logged a 504 from the service.

So I had to do some investigation into the matter server-side. After all, it was during the client request that the timeout occurs, so it was the best place to start. I tried re-deploying the application to the QA cluster multiple times, digging through IIS configuration settings, and double checking my code changes until I figured out the magic bit I was missing.

The request was being cutoff by IIS because it was too large for whatever reason. So I simply added this line to my Web.config for the IIS project in Visual Studio:

<system.web>
    <!-- ... -->

    <httpRuntime maxRequestLength="16384"/>

    <!-- ... -->
</system.web>

The **maxRequestLength **attribute of **httpRuntime **controls how much information IIS will accept before throwing an error. In this case it was trying to build up our desired database query, but was exceeding the limit. For testing purposes, I have increased the limit to 16384KB or 16MB. This allowed the ClickOnce application to receiving all the information it wanted, and our QA team in India was able to run the application as expected.

There are some things to keep in mind with maxRequestLength. It is an attribute in ASP websites to prevent DOS attacks on the machine. It prevents a malicious user from making a huge HTTP request in an attempt to cause the server to lock up or crash from a request of that size. In this case it was cutting my application off too soon before it could load up any results from the request.

Read More
Specialized C# Operators

In a previous post I went over some random C# operators. This article is a follow-up to that one, covering some more advanced C# operators and techniques. Specifically, the ?: operator, the ~ operator, |= operator, and the ^= operator.

We will start off with the conditional operator ?:. This operator is used to simplify an expression to test for a boolean value, and execute specific code that matches the value. Let’s start off with a code snippet that does not use the ?: operator.

int TestValue = 6;
int result = -1;

if(TestValue <= 5)
    result = 0;
else
    result = 1;

Instead we can use ?: to simplify that. We can refactor that into a new code snippet:

int TestValue = 6;

int result = TestValue <= 5 ? 0 : 1;

In plain English the ?: operator reads as:

condition ? CodeIfTrue : CodeIfFalse;

Now we will move onto the ~ operator. This operator is used for a NOT bitwise operation, or better stated from MSDN:

The ~ operator performs a bitwise complement operation on its operand. Bitwise complement operators are predefined for int, uint, long, and ulong.

Source: ~ Operator

A NOT bitwise operation is also known as a one’s compliment operation. It takes the binary of a variable or object, and flips each bit to a 0 if it was a 1, and to a 1 if it was a 0. The code below demonstrates the operator:

byte OriginalValue = 208;
byte complement = (byte) ~OriginalValue;

string OriginalString = Convert.ToString(OriginalValue, 2);
string ComplementString = Convert.ToString(complement, 2);

Console.WriteLine(OriginalString.PadLeft(8, '0'));
Console.WriteLine(ComplementString.PadLeft(8, '0'));

/*
Prints to screen the following:
11010000
00101111
*/

As you can see, all of the bits are flipped to their opposite partner. This is could be useful if you are using C# to interact with a piece of hardware, and need to manipulate the bits of data that is exchanged with said hardware.

Next we have the |= operator. This operator performs a bitwise OR operation against a variable. So when compare two values, if one or both are true, then the result must be true. The following C# code shows an example of the OR operation:

byte Value1 = 245;
byte Value2 = 113;

string Value1String = Convert.ToString(Value1, 2);
string Value2String = Convert.ToString(Value2, 2);

Console.WriteLine(Value1String.PadLeft(8, '0'));
Console.WriteLine(Value2String.PadLeft(8, '0'));

Value1 |= Value2;
string ResultString = Convert.ToString(Value1, 2);
Console.WriteLine("OR:");
Console.WriteLine(ResultString.PadLeft(8, '0'));

/*
Prints to screen the following:
11110101
01110001
OR:
11110101
*/

Once again, this is useful for specific hardware signaling or situations where specific binary operations are needed.

Finally we have the ^= operator. This operator is another bitwise operator, specifically the exclusive OR (XOR). An XOR operation returns a true result if exactly one operand has a true value. If both compared values are true or both are false, XOR will yield a false result. This code snippet demonstrates how it works in C#:

byte Value1 = 245;
byte Value2 = 113;

string Value1String = Convert.ToString(Value1, 2);
string Value2String = Convert.ToString(Value2, 2);

Console.WriteLine(Value1String.PadLeft(8, '0'));
Console.WriteLine(Value2String.PadLeft(8, '0'));

Value1 ^= Value2;
string ResultString = Convert.ToString(Value1, 2);
Console.WriteLine("XOR:");
Console.WriteLine(ResultString.PadLeft(8, '0'));

/*
Prints to screen the following:
11110101
01110001
XOR:
10000100
*/

Again, this is useful for things like hardware communication or data stream manipulation.

There are a ton more bitwise operations that C# can perform, all of which are detailed on MSDN

Read More
IronPython and C#

So the other day I wrote about dynamic types in C#. I covered a few use cases from COM interaction to working with other languages. Well, today I have put together an example for you that will load a Python file into C#, through IronPython.

Before we can work with IronPython in C#, we need to setup our environment. Here is a quick overview of the steps we will take before we work with IronPython:

  1. Install the latest stable release of IronPython
  2. Create a new C# Console Application in Visual Studio 2010
  3. Add required references for IronPython
  4. …then write the code!

The first step in working with IronPython in Visual Studio 2010 is to actually install IronPython. You’ll need to visit IronPython.net to grab the latest version of IronPython. Just install the latest stable release. For reference, I installed IronPython version 2.6.1 when I wrote this article. Just install all the recommended components. After that is done you can go ahead and startup Visual Studio.

After Visual Studio has started up, you’ll need to start a new C# Console Application project. After you have created that we are going to need to add references (Right-Click on References in the Solution Explorer > “Add Reference…”) to this project. Assuming you installed IronPython in the default directory you will find all the needed references in “C:\Program Files\IronPython 2.6 for .NET 4.0” on 32-bit systems and “C:\Program Files (x86)\IronPython 2.6 for .NET 4.0” on 64-bit systems. We will be adding the following references:

  • IronPython
  • IronPython.Modules
  • Microsoft.Dynamic
  • Microsoft.Scripting

Now we can actually get to the code creation! First we are going to make a new text file in the root of our project, and we will call it PythonFunctions.py. When that has been created you’ll need to update the properties on that file, specifically set Copy to Output Directory to Copy always. Now we will fill out our Python file with some Python functions:

def hello(name):
	print "Hello " + name + "! Welcome to IronPython!"
	return

def add(x, y):
	print "%i + %i = %i" % (x, y, (x + y))
	return

def multiply(x, y):
	print "%i * %i = %i" % (x, y, (x * y))
	return

This file is describing three basic functions in Python: A function that says “Hello {Name}! Welcome to IronPython!” and two math functions. All of these functions will print to our console in C# using the Python print command.

Now that we have our python prepared, we will rename the generic Program.cs file to IronPythonMain.cs. As always allow Visual Studio to update the references in the file when prompted. Our C# file will follow this workflow:

  • Create the IronPython Runtime
  • Enter a try/catch block to catch any exceptions
  • Attempt to load the Python file
  • Run the Python Commands
  • Exit the Program

So here is the C# that will run our IronPython program:

using IronPython.Hosting;
using IronPython.Runtime;
using Microsoft.Scripting.Hosting;
using System;

namespace IntroIronPython
{
    class IronPythonMain
    {
        static void Main(string[] args)
        {
            // Create a new ScriptRuntime for IronPython
            Console.WriteLine("Loading IronPython Runtime...");
            ScriptRuntime python = Python.CreateRuntime();

            try
            {
                // Attempt to load the python file
                Console.WriteLine("Loading Python File...");
                // Create a Dynamic Type for our Python File
                dynamic pyfile = python.UseFile("PythonFunctions.py");
                Console.WriteLine("Python File Loaded!");

                Console.WriteLine("Running Python Commands...\n");

                /**
                 * OK, now this is where the dynamic type comes in handy!
                 * We will use the dynamic type to execute our Python methods!
                 * Since the compiler cannot understand what the python methods
                 * are, the issue has to be dealt with at runtime. This is where
                 * we have to use a dynamic type.
                 */

                // Call the hello(name) function
                pyfile.hello("Urda");
                // Call the add(x, y) function
                pyfile.add(5, 17);
                // Call the multiply(x , y) function
                pyfile.multiply(5, 10);
            }
            catch (Exception err)
            {
                // Catch any errors on loading and quit.
                Console.WriteLine("Exception caught:\n " + err);
                Environment.Exit(1);
            }
            finally
            {
                Console.WriteLine("\n...Done!\n");
            }
        }
    }
}

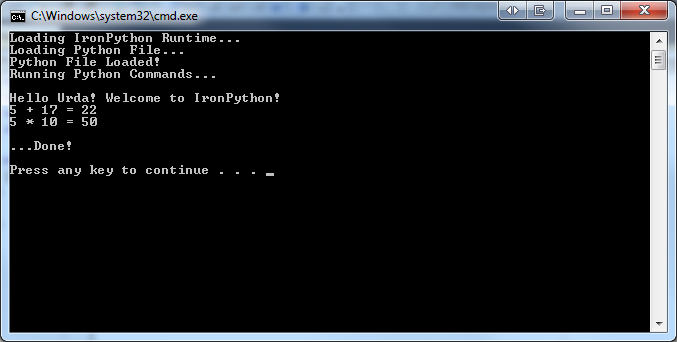
When the program is run, we are greeted with this output:

IronPython Output

Again take note, that it is the print function from the Python file that is driving the console output in this application. All C# is doing is opening up the runtime, loading the Python file, and just calling the Python methods we defined.

Through the power of IronPython and C# dynamic types we are able to pull Python code and functions into C# for use. The dynamic type will figure out what it needs to be at runtime from the Python file. It will also locate and invoke the Python functions we call on it through the IronPython runtime. All of this can be conducted on Python code that you may already have, but have not transitioned it to the C# language. This entire project is a perfect example of using C# and Python together through the strange dynamic type in C#.

Read More
Dynamic Types in C#

When C# 4.0 was released, it added a new type for variables called dynamic. The dynamic type is a static type, but it is an object that bypasses static type checking. Now if your head has just exploded from reading that last sentence I apologize. When you compile an application that contains any dynamic types, those dynamic objects are assumed to support any operation that may be ran against them. This allows a developer to not worry about where a method is coming from be it XML, DOM, or other dynamic languages like IronPython. However, if at runtime a method or command does not exist errors will be thrown at run-time instead.

All of these basic concepts come together to form the concept of a C# dynamic type. The dynamic type in C# is a strange, new concept that has some interesting use cases. Those use cases usually apply to interacting with other languages or documents.

Let’s say I build a simple class that describes a person object. I will also go ahead and create a main class, build a person object with the dynamic type, and print one line to screen.

using System;

namespace IntroDynamicTypes
{
    class Person
    {
        public Person(string n)
        {
            this.Name = n;
        }

        public string Name { get; set; }
    }

    class DynamicTypesProgram
    {
        static void Main(string[] args)
        {
            dynamic DynamicPerson = new Person("Urda");
            Console.WriteLine("Person Created, Name: " +
                              DynamicPerson.Name);
            // Prints "Person Created, Name: Urda"
        }
    }
}

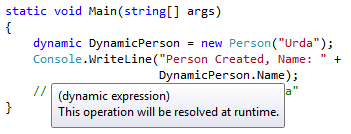
Now you may notice as you key this into Visual Studio 2010 you will not have your normal IntelliSense to guide you. You will be prompted with this notice:

No IntelliSense

Since we have defined this person object as dynamic, we can use any method we want with it! The compiler will not check for anything or stop you from building an application with objects using undefined methods. This is because a dynamic class can call these methods at run time, with the expectation that the method definitions and code will exist when the program is ran. In fact we can even add some more code into our main like so…

static void Main(String[] args)
{
    dynamic DynamicPerson = new Person("Urda");
    Console.WriteLine("Person Created, Name: " +
                      DynamicPerson.Name);
    // Prints "Person Created, Name: Urda"

    // This will throw an error only at runtime,
    // *not* at compile time!
    DynamicPerson.SomeMagicFunction();
}

At this point you’ll notice we have added a method called SomeMagicFunction that does not exist in the class, but Visual Studio 2010 still lets us compile the application. It is only at run time that this application will throw an error when it attempts to make a call to SomeMagicFunction. But if the function was made available through some form of interop, you would be able to execute that function against the object.

So dynamic types allows C# to play nice with other languages such as IronPython, HTML DOMs, COM API, or somewhere else in a program. Think of the dynamic type as a way to bridge the gap between strongly typed components such as C# and weakly type components such as IronPython, COM, or other DOM objects.

Read More
Understanding Path Limits in TFS

Team Foundation Server (TFS) is bound to a some limitations that can potentially break your Visual Studio project. One of these limitations is the character count limit in a file path. If you overshoot this limit you will run into issue when adding new files to TFS or attempting to compile your project in Visual Studio. Here is a quick overview explaining why TFS behaves like this and what you can do about it.

When attempting to add a file to TFS or Visual Studio for compilation, you will be prompted with this error:

The specified path, file name, or both are too long. The fully qualified file name must be less than 260 characters, and the directory name must be less than 248 characters.

So why is this an issue? Surely modern operating systems should not be bound to these kinds of restrictions. After all, once you get past C:\Users[Username]\Documents\Projects... you have already eaten up 40 or so characters! This is an issue since TFS is apparently making non-unicode calls to create paths. When a program makes a non-unicode call, it will be limited to 260 characters for the path. This is not an issue with other programs that make a unicode call through the Windows API to create paths, as their limit is actually 32,767 characters.

So what can you do about this? The best thing to do is to shorten your base path. You can easily do this by moving your project from, say ‘My Documents’, to something along the lines of C:\Projects or C:\TFS

If you are really interested in the full technical details of this issue, you can visit MSDN for more information.

Read More
Random C# Tricks

I wanted to share a few C# tricks I reviewed today. Some programmers will use them all the time, others barely know about their existence.

In this short source code example I will be demoing the ?? operator, chaining ??, and String.IsNullOrWhiteSpace() which is a newer .NET method.

So here is the source I’ll talk about:

using System;

namespace C.Sharp.Tricks
{
    class Tricks
    {
        static void Main(string[] args)
        {
            /*** ?? Operator ***/
            // Allow x to be null by using 'int?'
            int? x = null;

            // Set y = x if not null, otherwise use 30 for a value
            int y = x ?? 30;

            // Print the results to screen
            Console.WriteLine("*** ?? Operator ***");
            Console.WriteLine("y = x ?? 30\ny = {0}\n", y);

            /*** Chaining ?? Operators **/
            // Set z = x if not null, else if w not null, else y + 1
            int? w = null;
            int z = x ?? w ?? (y + 1);

            // Print the results to screen
            Console.WriteLine("*** Chaining ?? Operators ***");
            Console.WriteLine("z = x ?? w ?? (y + 1)\nz = {0}\n", z);

            /*** String, Null or Empty (Whitespace)? ***/
            // Make a null string, empty string (spaces), and one with 'Hello!'
            string string1 = null;
            string string2 = "      ";
            string string3 = "Hello!";

            // Print the results to screen
            Console.WriteLine("*** String, Null or Empty? ***");
            Console.WriteLine("string1 ... ({0}) -- Null or Empty? " +
                              String.IsNullOrWhiteSpace(string1), string1);
            Console.WriteLine("string2 ... ({0}) -- Null or Empty? " +
                              String.IsNullOrWhiteSpace(string2), string2);
            Console.WriteLine("string3 ... ({0}) -- Null or Empty? " +
                              String.IsNullOrWhiteSpace(string3), string3);
        }
    }
}

The ?? operator is a simple way to set a variable to something, and if that first condition is null it will fallback to a second value. So since x is null, y will end up being set to 30. The program outputs the expected result to prove that.

Next we will chain the ?? operators together. In my example both x and w are null, so z will have to be set to (y + 1), or 31. The program again prints the expected result to screen.

The benefit that ?? brings to the table is that it turns what could have been a complicated if/else statement, into a logic one-liner. It is also a nice convenience since you can write code that may or may not have to deal with an uninstantiated variable at runtime very easily.

Finally, I have a block of code that shows how the new String.IsNullOrWhiteSpace() method from .NET version 4 works. Basically, the method returns true if a given string is null, or just a bunch of whitespace; otherwise it will return false. So I send in a null, a string with just spaces, and a string with a phrase and I print the expected results to screen. This method could be helpful to determine if the user entered in a space or spaces when in reality it should have been sent in as null or just empty.

Here is a screenshot of the running program:

Program Output

I found these either new or exciting to use today, and I hope you can find interesting ways to incorporate them in your software design!

Read More
Windows Communication Foundation - A Simple Client and Server

Windows Communication Foundation (or WCF for short) is an interface located inside the .NET Framework for creating connected, service-oriented applications. We can use C# and Visual Studio 2010 to build a simple WCF Client and WCF Server. We will start by developing the server and the service it will provide, and from that we can build a WCF Client based on that very server.

First we need to setup our project…

  1. Start Visual Studio 2010 as an Administrator

  2. Create a new Console Application, you can name it WCF.Tutorial.Server

  3. Change the default Service namespace to Microsoft.ServiceModel.Samples

  4. Open the Properties of the of the solution

  5. Select the Application Tab

  6. Change the box Default Namespace to Microsoft.ServiceModel.Samples

  7. You will need to add a reference to System.ServiceModel.dll in your new project.

  8. Rename Program.cs to Server.cs

  9. Update the namespace line inside Server.cs to Microsoft.ServiceModel.Samples

  10. Add using System.ServiceModel; to your Server.cs file.

…and NOW we are ready to build our interface for the service. In this case we are going to build a calculator.

using System;
using System.ServiceModel;
using System.ServiceModel.Description;

namespace Microsoft.ServiceModel.Samples
{
    [ServiceContract(Namespace = "http://Microsoft.ServiceModel.Samles")]
    public interface ICalculator
    {
        [OperationContract]
        double Add(double n1, double n2);
        [OperationContract]
        double Subtract(double n1, double n2);
        [OperationContract]
        double Multiply(double n1, double n2);
        [OperationContract]
        double Divide(double n1, double n2);
    }

    public class CalculatorService : ICalculator
    {
        public double Add(double n1, double n2)
        {
            double result = n1 + n2;
            Console.WriteLine("Received Add({0},{1})", n1, n2);
            // Code added to write output to the console.
            Console.WriteLine("Return: {0}", result);
            return result;
        }

        public double Subtract(double n1, double n2)
        {
            double result = n1 - n2;
            Console.WriteLine("Received Subtract({0},{1})", n1, n2);
            Console.WriteLine("Return: {0}", result);
            return result;
        }

        public double Multiply(double n1, double n2)
        {
            double result = n1 * n2;
            Console.WriteLine("Received Multiply({0},{1})", n1, n2);
            Console.WriteLine("Return: {0}", result);
            return result;
        }

        public double Divide(double n1, double n2)
        {
            double result = n1 / n2;
            Console.WriteLine("Recieved Divide({0},{1})", n1, n2);
            Console.WriteLine("Return: {0}", result);
            return result;
        }
    }

    class Server
    {
        static void Main(string[] args)
        {
            Uri BaseAddress = new Uri("http://localhost:8000/ServiceModelSamples/Service");

            ServiceHost SelfHost = new ServiceHost(typeof(CalculatorService), BaseAddress);
            try
            {
                SelfHost.AddServiceEndpoint(
                        typeof(ICalculator),
                        new WSHttpBinding(),
                        "CalculatorService");

                ServiceMetadataBehavior smb = new ServiceMetadataBehavior();
                smb.HttpGetEnabled = true;
                SelfHost.Description.Behaviors.Add(smb);

                SelfHost.Open();
                Console.WriteLine("The service is ready.");
                Console.WriteLine("Press <ENTER> to terminate service.");
                Console.WriteLine();
                Console.ReadLine();

                // Close the ServiceHostBase to shutdown the service.
                SelfHost.Close();
            }
            catch (CommunicationException ce)
            {
                Console.WriteLine("An exception occured: {0}", ce.Message);
                SelfHost.Abort();
            }
        }
    }
}

The first block of code defines our calculator interface, or ICalculator. We have directives before each method, named OperationContractAttribute, that define what portions of this interface are being exposed for the WCF contract. Pretty straight forward.

Then our second block of code actually defines our CalculatorService. We have added some Console.WriteLine statements that will appear when we start the service up. Again, the operations this calculator is doing are very simple and could easily be added to a standalone program. However, we will be using this to demonstrate how to setup a WCF client-server environment.

Our final block of code defines the Server class. This will be in charge of spinning up the application and listening on a specified host and port number. In this case it will listen from localhost on port 8000. We declare a new service host, and attempt to bind the server to it. If it fails we catch the error and dump it to screen. If not, it will fire up the service and be ready for use! So go ahead and run your project (without debugging) and after it starts verify that the server is running by opening your web browser and navigating to http://localhost:8000/ServiceModelSamples/Service. You’ll see a screen like this:

WCF Server, Web Browser Page

Now we can just leave that running, and go ahead and build our Client project. Just do the following…

  1. Add a new project to the root of your Solution. Choose Console Application and name it WCF.Tutorial.Client
  2. Add a reference to System.ServiceModel.dll to the new project
  3. Rename Program.cs to Client.cs
  4. Add using System.ServiceModel; to the source code.

Now here is where we can use Visual Studio to build some code for us. Go ahead and open up the Visual Studio 2010 Command Prompt from your Program Files. Inside the command prompt navigate to the location of your client code project.

Now when you are inside the directory you want the generated code to be placed, run this command:

svcutil.exe /language:cs /out:generatedProxy.cs /config:app.config http://localhost:8000/ServiceModelSamples/service

Now all you have to do is add the generatedProxy file to your project. That should be as simple as clicking Show All Files and then Include in Project.

Now let’s define the client:

using System;
using System.ServiceModel;
using System.Text;

namespace Client
{
    class Client
    {
        static void Main(string[] args)
        {
            // Step 1: Create an endpoint address and an instance of the WCF client
            CalculatorClient client = new CalculatorClient();

            // Step 2: Call the service operations.
            // Call Add
            double value1 = 100.00D;
            double value2 = 15.99D;
            double result = client.Add(value1, value2);
            Console.WriteLine("Add({0},{1}) = {2}", value1, value2, result);

            // Call Subtract
            value1 = 145.00D;
            value2 = 76.54D;
            result = client.Subtract(value1, value2);
            Console.WriteLine("Subtract({0},{1}) = {2}", value1, value2, result);

            // Call Multiply
            value1 = 9.00D;
            value2 = 81.25D;
            result = client.Multiply(value1, value2);
            Console.WriteLine("Multiply({0},{1}) = {2}", value1, value2, result);

            // Call Divide
            value1 = 22.00D;
            value2 = 7.00D;
            result = client.Divide(value1, value2);
            Console.WriteLine("Divide({0},{1}) = {2}", value1, value2, result);

            // Step 3: Close the client gracefully.
            // This closes the connection and cleans up resources.
            client.Close();

            Console.WriteLine();
            Console.WriteLine("Press <ENTER> to terminate client.");
            Console.ReadLine();
        }
    }
}

The first step is to create a CalculatorClient object. Then it is as simple as calling any of the following:

client.Add(...);
client.Subtract(...);
client.Multiply(...);
client.Divide(...);

All the above commands will cause our Client app to hit the Server app with requests. The Server app will then run the methods and send back results to the Client. Here is a screenshot of the applications running side-by-side:

WCF Client, Server Outputs

With WCF you can setup dedicated application servers for your client apps to hit with requests. These requests can then be processed either synchronously or asynchronously. In this example we ran the commands synchronously, so we had to wait for the server to kick back results to us. But you could instead build a giant processing server, and have clients request asynchronous tasks and just catch a callback.

WCF can be applied for use in…

  • Distributed Processing
  • Threaded Web Applications
  • Dedicated Servers hosting specific services, all based on their capability
  • Routing tasks [ Client <-—> Proxy(WCF Server & Client) <-—> Server ]
  • …any other possible Client-Server task you would need! The possibilities are up to you.

All of this is easily setup and built by just using C#, .NET, and Visual Studio

  1. If you can write your methods and algorithms in C#, you can extend them for use in WCF.
Read More
Write to XML with C#

So we can read XML in a variety of ways (one example here, and another here). So can we write it in C#? Of course we can! So lets jump right into shall we?

So here is the steps I take in this sample:

using System;
using System.Xml;

namespace WriteXML01
{
    // Let's establish a generic Person Class, and define necessary methods
    class PersonObject
    {
        public string fname { get; set; }
        public string lname { get; set; }
        public int age { get; set; }
        public char gender { get; set; }

        public PersonObject(string f, string l, int a, char g)
        {
            this.fname = f;
            this.lname = l;
            this.age = a;
            this.gender = g;
        }
    }

    class WriteXML01
    {
        static void Main(string[] args)
        {
            // Let's Build a few people
            PersonObject Urda = new PersonObject("Test", "Urda", 21, 'M');

            // Lets define an XML document
            XmlDocument XMLDoc = new XmlDocument();

            // Create an XML declaration
            XmlDeclaration XMLDec =
                XMLDoc.CreateXmlDeclaration("1.0", "utf-8", null);

            // Create the root of the XML file
            XmlElement RootNode = XMLDoc.CreateElement("People");
            // Make sure the declaration gets inserted before the XML root
            XMLDoc.InsertBefore(XMLDec, XMLDoc.DocumentElement);
            // Add the root
            XMLDoc.AppendChild(RootNode);

            // Make an object to store the elements in
            XmlElement PersonToXML = XMLDoc.CreateElement("Person");
            // And add that to the XML document
            XMLDoc.DocumentElement.PrependChild(PersonToXML);

            // Make the Elements
            XmlElement FNameNode = XMLDoc.CreateElement("FirstName");
            XmlElement LNameNode = XMLDoc.CreateElement("LastName");
            XmlElement AgeNode = XMLDoc.CreateElement("Age");
            XmlElement GenderNode = XMLDoc.CreateElement("Gender");

            // Load the info for the text information
            XmlText FNameText = XMLDoc.CreateTextNode(Urda.fname);
            XmlText LNameText = XMLDoc.CreateTextNode(Urda.lname);
            XmlText AgeText = XMLDoc.CreateTextNode(Urda.age.ToString());
            XmlText GenderText =
                XMLDoc.CreateTextNode(Urda.gender.ToString());

            // Add the elements into the object
            PersonToXML.AppendChild(FNameNode);
            PersonToXML.AppendChild(LNameNode);
            PersonToXML.AppendChild(AgeNode);
            PersonToXML.AppendChild(GenderNode);

            // Add the text into the elmemnts
            FNameNode.AppendChild(FNameText);
            LNameNode.AppendChild(LNameText);
            AgeNode.AppendChild(AgeText);
            GenderNode.AppendChild(GenderText);

            // Prompt the user where to save to, provide the current local
            // directory if the user wants to use a relative path.
            Console.Write("Current Local Path: \n");
            Console.WriteLine(Environment.CurrentDirectory);
            Console.Write("\nSAVE AS? "
                          + "[CAUTION: This does overwrite files!]\n"
                          + "(defaults to ..\\..\\Output.xml) > ");
            string UserPath = Console.ReadLine();

            // Nothing? Default to something.
            if (UserPath == "")
            {
                UserPath = "..\\..\\Output.xml";
            }

            // Try/Catch issues
            try
            {
                XMLDoc.Save(UserPath);
            }
            catch (Exception e)
            {
                Console.WriteLine(e.Message);
                Environment.Exit(1);
            }

            Environment.Exit(0);
        }
    }
}

First I make a generic person class to store my data in, and get it back out for the XML later. This could resemble an object we could get from a data factory or a SQL database. But it is an object nonetheless.

We then define the declaration of the document, it just states what version and encoding we are using in this specific XML file. We then use some XmlDocument methods to make sure that a root node (People in this case) is created and that our declaration is stuck right before it.

Once that is all said and done, we create a parent node, PersonToXML in this case, and add it after our root node with PrependChild.

We then use multiple lines of code create the Elements for our XML object, and the text they will contain. We use even more XmlDocument methods to add these in order to build our logical structure. Finally, we get a path from the user, catch exceptions if needed, and write the XML file.

The file overwrites Output.xml each time it is ran, and it produces the same results every time (surprising, I know). So be careful!

Pretty simple huh? Just add some loops or database calls, and you can be using XML for just about anything you can think of!

Read More
Solution Folders in Visual Studio 2010 Explained

If you are new to Visual Studio, you may not be familiar with how “Solution Folders” work. Visual Studio allows you to group together any number of sub-projects that your root solution may contain. However, what is strange about Solution Folders in Visual Studio is that they do not create the same logical structure on your disk. Solution Folders will not create a mirror on your hard drive. They just create a logical grouping inside your Visual Studio Project. They will not move files around, or create directories for your projects when you create Solution Folders and place your projects inside them. It is a good practice to have your logical project structure to have a one-to-one relationship with your physical directory structure, and the behavior of the Solution Folders do not follow this. But there is a way for Visual Studio to create the physical structure on the disk when adding projects to the solution.

Let’s say you have a project located at C:\VS.Projects and you have a number of other projects contained within it. Well your personal projects have become too cumbersome and are in great need of folders for grouping. You want to use Solution Folders to group them together. So you group them together, and your Visual Studio Solution structure looks nice and wonderful. You build your project, and the build succeeds as before. You are so excited you decide to go ahead and make a backup of your project for the day. After all it was a lot of work moving those projects around in the Solution Explorer!

However when you check the actual folder on your hard drive, you discover that there are no sub-folders inside C:\VS.Projects ! All the sub-projects are still lying around without any organization whatsoever. You are now frustrated that Visual Studio must have tricked you. So you go ahead and move the files around to match your structure in Visual Studio. After that is all done, you fire up Visual Studio and grab yourself a cup of coffee while it starts up.

When you return you are shocked to see your project no longer works at all. All the sub-projects are complaining that they are “Unavailable” or are unable to be read from the disk. You can’t open any of your source files, nothing is there anymore! Oh the horror!

This terrible occurrence could have easily been avoidable. So what can you do about it?

First off it is easiest to use Solution Folders right away the correct way. This article will cover that approach and let Visual Studio 2010 do all the work. So let’s create a new Console Application that we want stored in C:\VS.Projects\Test\MyApp since you are planning on writing a new application for testing.

We are going to create the solution folder first, by Right-Clicking on the root of the project, then clicking ‘Add’, and then clicking ‘New Solution Folder’. We go ahead and type in ‘Test’ and so our project looks like this:

Solution Explorer

Now we will go ahead and create our Console Application inside the ‘Test’ Solution Folder. We will do that by Right-Clicking on ‘Test’, then clicking ‘Add’, and then clicking ‘New Project’. We select “Console Application” from the Visual C# - Windows templates, and we fill in ‘MyApp’ in the Name field. But do not click OK yet!

Pay attention to this critical step: We need to change the location of this project to correctly reflect our desired one-to-one relationship when it comes to comparing Solution Folders to actual physical folders on the hard drive. So we are going to tack on ‘\Test' to the end of the Location Path. This will cause Visual Studio to automatically create a sub-folder inside the VS.Projects folder named ‘Test’, and then place our new project titled ‘MyApp’ inside the new folder on the hard drive. Your project screen will look like this before you submit it:

Add New Project Dialog

When we click ‘OK’ our new project will be setup as normal in Visual Studio. It will be placed underneath the new Solution Folder, and Visual Studio has already created the structure on the disk to mirror your project now. Here is the Solution Explorer and Windows Explorer compared for reference:

Final Result

There you go!

Now if you had already had a bunch of projects you wanted to organize, you’re best bet is to remove each project from your solution, reorganize them on your hard drive, and then re-import them inside new solutions folders. This method is not in the scope of this article, but for the experienced Visual Studio users it should be straight forward to remove and re-add your projects correctly.

So hopefully this guide helps clear up some confusion for newer users to Visual Studio when it comes to Solution Folders, and how they work.

Read More